OpenStack Fundamentals: Membangun Private Cloud dari Nol
OpenStack adalah platform IaaS open source yang digunakan untuk membangun private cloud. Blog ini membahas arsitektur, komponen inti, cara instalasi, dan simulasi lab lengkap dari nol sampai VM bisa diakses.

OpenStack adalah project IaaS (Infrastructure as a Service) open source yang awalnya dikembangkan bersama oleh Rackspace dan NASA. Saat ini dipakai oleh CERN, Walmart, BMW, dan ratusan organisasi lain untuk membangun private cloud mereka sendiri.
Perbedaan mendasar dengan cloud publik seperti AWS atau GCP: infrastrukturnya jalan di hardware sendiri, dikelola sendiri, dan datanya tidak keluar dari datacenter sendiri.
1. Arsitektur OpenStack
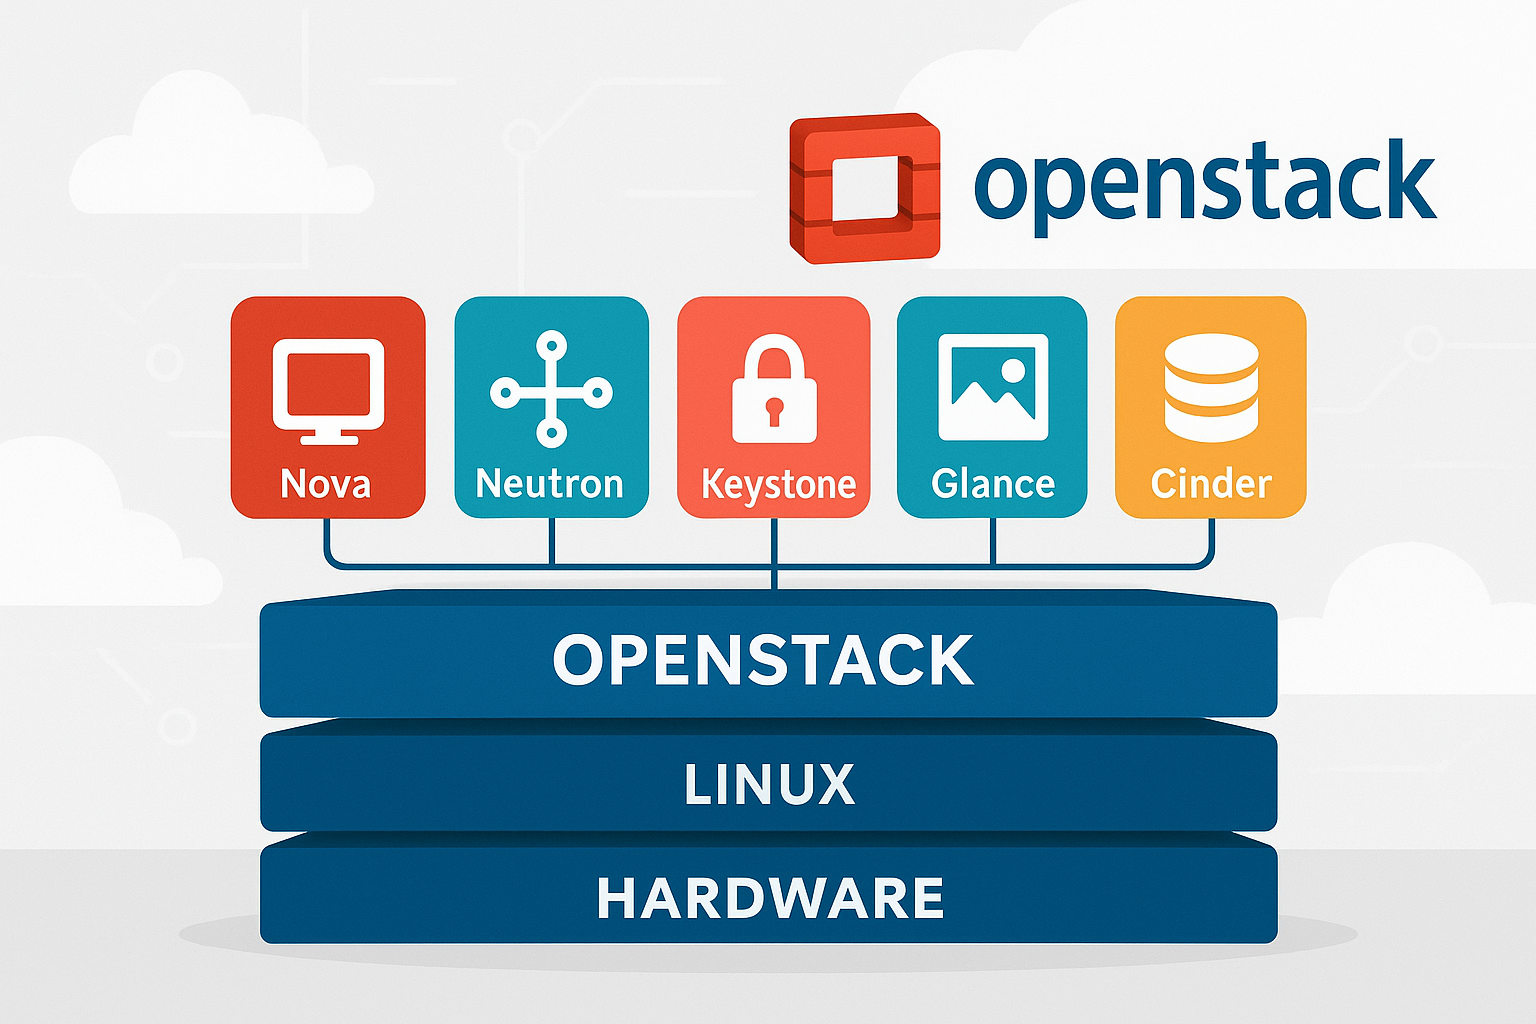
OpenStack bukan satu aplikasi. Ini adalah kumpulan service yang masing-masing punya peran spesifik dan berkomunikasi satu sama lain lewat REST API serta message queue (RabbitMQ).
Daftar service inti:
| Service | Code Name | Fungsi |
|---|---|---|
| Identity | Keystone | Authentication dan authorization untuk semua service |
| Compute | Nova | Membuat dan mengelola virtual machine |
| Networking | Neutron | Virtual network, router, floating IP, security group |
| Image | Glance | Menyimpan dan mendistribusikan disk image (template OS) |
| Block Storage | Cinder | Persistent volume yang bisa di-attach ke VM |
| Object Storage | Swift | Menyimpan file/blob dalam skala besar |
| Dashboard | Horizon | Web UI untuk semua service |
| Orchestration | Heat | Deploy infrastruktur via template YAML |
| Telemetry | Ceilometer | Monitoring dan metering resource |
| Placement | Placement | Tracking resource inventory dan usage |
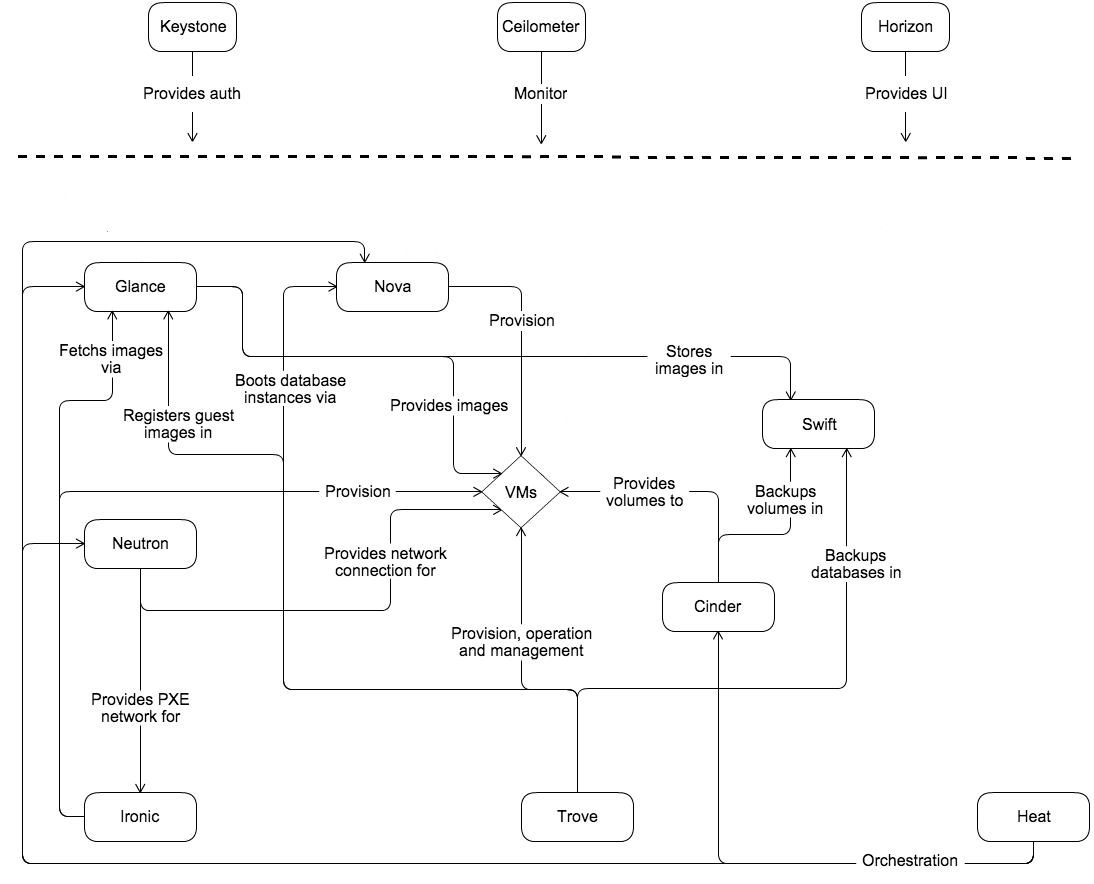
Alur Request "Buat VM"
Ini penting dipahami sebelum masuk ke lab, supaya jelas kenapa ada banyak service yang terlibat dalam satu aksi sederhana:
User: openstack server create ...
        │
        ▼
[1] Keystone        → validasi token, cek permission di project
        │
        ▼
[2] Nova API        → terima request, kirim ke scheduler via RabbitMQ
        │
        ▼
[3] Nova Scheduler  → pilih compute node berdasarkan filter dan weight
        │
        ├──► [4] Glance      → download disk image ke compute node
        │
        ├──► [5] Neutron     → buat port, assign IP, konfigurasi OVS
        │
        ├──► [6] Cinder      → attach volume jika diminta
        │
        └──► [7] Nova Compute → spawn VM via libvirt/KVM di compute node
                     │
                     └──► VM running, IP assigned
Semua koordinasi antar service lewat RabbitMQ (async) dan langsung via HTTP (sync tergantung flow).
2. Model Deployment
Ada beberapa cara deploy OpenStack tergantung kebutuhan dan kapasitas hardware.
2.1 All-in-One (DevStack)
Semua service jalan di satu server. Hanya cocok untuk development dan belajar, bukan produksi.
[ Single Server ]
  - Controller services (Keystone, Nova API, Neutron Server, Glance)
  - Compute (Nova Compute + KVM)
  - Storage (Cinder, Swift)
  - Network (Neutron + OVS)
  - Database (MariaDB)
  - Message Queue (RabbitMQ)
Batas: kalau server mati, seluruh cloud mati.
2.2 Multi-Node (Standar Produksi)
Service dipecah ke beberapa server sesuai peran:
                    ┌─────────────────────────────┐
                    │      Controller Node        │
                    │  Keystone, Nova API,        │
                    │  Neutron Server, Glance,    │
                    │  Horizon, MariaDB,          │
                    │  RabbitMQ, Memcached        │
                    └──────────────┬──────────────┘
                                   │ Management Network
          ┌────────────────────────┼────────────────────────┐
          │                        │                        │
┌─────────▼────────┐   ┌──────────▼───────┐   ┌────────────▼────────┐
│  Compute Node 1  │   │  Compute Node 2  │   │   Storage Node      │
│  Nova Compute    │   │  Nova Compute    │   │   Cinder Volume     │
│  Neutron Agent   │   │  Neutron Agent   │   │   Swift Storage     │
│  KVM/QEMU        │   │  KVM/QEMU        │   │   Ceph (opsional)   │
└──────────────────┘   └──────────────────┘   └─────────────────────┘
Keunggulan: controller bisa di-HA, compute node bisa ditambah horizontal.
2.3 High Availability (HA)
Controller di-cluster minimal 3 node (odd number), database pakai Galera cluster, RabbitMQ cluster, dan load balancer (HAProxy) di depan.
                  ┌──────────────────────┐
                  │     Load Balancer    │
                  │     (HAProxy/VIP)    │
                  └──────┬───────┬───────┘
                         │       │
             ┌───────────▼──┐ ┌──▼──────────┐ ┌─────────────┐
             │ Controller 1 │ │ Controller 2 │ │ Controller 3│
             │ (Active)     │ │ (Active)     │ │ (Active)    │
             └──────────────┘ └──────────────┘ └─────────────┘
                    │                 │                │
             ┌──────┴─────────────────┴────────────────┴──────┐
             │             Galera / MariaDB Cluster            │
             └─────────────────────────────────────────────────┘
2.4 Metode Instalasi
| Metode | Cocok Untuk | Kompleksitas |
|---|---|---|
| DevStack | Belajar, development | Rendah |
| OpenStack-Ansible | Produksi, otomasi | Menengah-Tinggi |
| Kolla-Ansible | Produksi, containerized | Menengah-Tinggi |
| Manual (paket distro) | Belajar arsitektur | Tinggi |
| MicroStack / Snap | Workstation, demo | Rendah |
3. Lab: Instalasi DevStack (All-in-One)
Spesifikasi yang Dibutuhkan
| Resource | Minimum | Agar nyaman |
|---|---|---|
| CPU | 4 core, VT-x/AMD-V aktif | 8 core |
| RAM | 8 GB | 16 GB |
| Disk | 50 GB | 100 GB SSD |
| OS | Ubuntu 22.04 LTS | Ubuntu 22.04 LTS |
| Network | 1 NIC dengan internet | 2 NIC |
Bisa pakai VirtualBox, VMware, atau VPS (Hetzner CX31 atau setara).
Langkah Instalasi
# Pastikan OS up to date
sudo apt-get update && sudo apt-get upgrade -y

# Buat user stack — DevStack tidak boleh dijalankan sebagai root
sudo useradd -s /bin/bash -d /opt/stack -m stack
sudo chmod +x /opt/stack
echo "stack ALL=(ALL) NOPASSWD: ALL" | sudo tee /etc/sudoers.d/stack
sudo chmod 0440 /etc/sudoers.d/stack

# Switch ke user stack
sudo -u stack -i

# Clone repository DevStack
git clone https://opendev.org/openstack/devstack /opt/stack/devstack
cd /opt/stack/devstack

# Cek IP server
ip addr show | grep "inet " | grep -v 127.0.0.1
# Output contoh:
# inet 192.168.1.100/24 brd 192.168.1.255 scope global eth0
Buat file konfigurasi local.conf:
cat > /opt/stack/devstack/local.conf << 'EOF'
[[local|localrc]]

# Password — ganti untuk lingkungan nyata
ADMIN_PASSWORD=Secret1234!
DATABASE_PASSWORD=$ADMIN_PASSWORD
RABBIT_PASSWORD=$ADMIN_PASSWORD
SERVICE_PASSWORD=$ADMIN_PASSWORD

# IP server ini
HOST_IP=192.168.1.100

# Logging
LOGFILE=/opt/stack/logs/stack.sh.log
LOGDAYS=1

# Services yang diaktifkan
ENABLED_SERVICES=rabbit,mysql,key

# Nova (Compute)
ENABLED_SERVICES+=,n-api,n-cpu,n-cond,n-sch,n-novnc,n-api-meta
ENABLED_SERVICES+=,placement-api

# Glance (Image)
ENABLED_SERVICES+=,g-api

# Neutron (Networking) — OVN backend
ENABLED_SERVICES+=,neutron,q-svc
Q_AGENT=ovn
Q_ML2_PLUGIN_MECHANISM_DRIVERS=ovn,logger
Q_ML2_TENANT_NETWORK_TYPE=geneve
Q_USE_PROVIDERNET_FOR_PUBLIC=True

# Cinder (Block Storage)
ENABLED_SERVICES+=,cinder,c-api,c-vol,c-sch

# Horizon (Dashboard)
ENABLED_SERVICES+=,horizon

# Nonaktifkan tempest jika RAM terbatas
# ENABLED_SERVICES+=,tempest
EOF
Jalankan instalasi:
cd /opt/stack/devstack
./stack.sh
Proses ini memakan waktu 20-40 menit tergantung kecepatan internet dan hardware. Output real-time:
[Call Trace]
./stack.sh:269:main
./stack.sh:253:run_phase
./stack.sh:220:install_keystone
...
+++ [[ "keystone" =~ ^keystone ]] && keystone_configure
...
+++ install_nova
+++ install_nova_compute
...
+++ [[ True == \T\r\u\e ]] && install_neutron
+++ configure_neutron
...
+++ install_cinder
...
Horizon is now available at http://192.168.1.100/dashboard
Keystone is serving at http://192.168.1.100/identity/
The default users are: admin and demo
The password: Secret1234!

Services:
+---------------------+-----------------------------+
| Service             | Status                      |
+---------------------+-----------------------------+
| devstack@keystone   | active (running)            |
| devstack@n-api      | active (running)            |
| devstack@n-cpu      | active (running)            |
| devstack@n-sch      | active (running)            |
| devstack@n-cond     | active (running)            |
| devstack@g-api      | active (running)            |
| devstack@q-svc      | active (running)            |
| devstack@c-api      | active (running)            |
| devstack@c-vol      | active (running)            |
| devstack@horizon    | active (running)            |
+---------------------+-----------------------------+

stack.sh completed in 1842 seconds.
Kalau ada error saat stack.sh, baca log:
tail -100 /opt/stack/logs/stack.sh.log
# atau cari baris ERROR:
grep -i "error\|fail" /opt/stack/logs/stack.sh.log | tail -20
Setup OpenStack CLI
# Load credential admin
source /opt/stack/devstack/openrc admin admin

# Atau buat RC file manual
cat > ~/adminrc << 'EOF'
export OS_PROJECT_DOMAIN_NAME=Default
export OS_USER_DOMAIN_NAME=Default
export OS_PROJECT_NAME=admin
export OS_USERNAME=admin
export OS_PASSWORD=Secret1234!
export OS_AUTH_URL=http://192.168.1.100/identity
export OS_IDENTITY_API_VERSION=3
export OS_IMAGE_API_VERSION=2
EOF

source ~/adminrc

# Verifikasi koneksi ke Keystone
openstack token issue
Output openstack token issue:
+------------+---------------------------------------------------------+
| Field      | Value                                                   |
+------------+---------------------------------------------------------+
| expires    | 2026-03-10T15:00:00+0000                                |
| id         | gAAAAABmXZ8k2RtKp8LuEsbn9mX3....(token panjang)         |
| project_id | a1b2c3d4e5f6789012345678abcdef00                        |
| user_id    | 9876543210abcdef12345678fedcba09                        |
+------------+---------------------------------------------------------+
Kalau muncul output seperti ini, Keystone berjalan dan credential valid.
2.5 Lab: Instalasi Multi-Node Manual (Controller + Compute)
Ini adalah cara yang lebih dekat ke deployment produksi sebenarnya. Dua server dibutuhkan:
| Server | Peran | IP |
|---|---|---|
| controller | Keystone, Nova API, Neutron, Glance, Horizon | 10.0.0.11 |
| compute1 | Nova Compute, Neutron Agent | 10.0.0.31 |
Persiapan Kedua Node
Lakukan di kedua server:
# Set hostname — sesuaikan per node
# Di controller:
sudo hostnamectl set-hostname controller

# Di compute1:
sudo hostnamectl set-hostname compute1

# Edit /etc/hosts di kedua node
sudo tee -a /etc/hosts << 'EOF'
10.0.0.11   controller
10.0.0.31   compute1
EOF

# Update dan install paket dasar
sudo apt-get update && sudo apt-get upgrade -y
sudo apt-get install -y chrony python3-openstackclient

# Konfigurasi chrony (NTP) — penting untuk OpenStack
# Di controller, tambahkan:
echo "allow 10.0.0.0/24" | sudo tee -a /etc/chrony/chrony.conf
sudo systemctl restart chrony

# Di compute1, sync ke controller:
echo "server controller iburst" | sudo tee -a /etc/chrony/chrony.conf
sudo systemctl restart chrony

# Verifikasi sinkronisasi NTP
chronyc sources
# Output:
# MS Name/IP address         Stratum Poll Reach LastRx Last sample
# ===============================================================================
# ^* controller                    3   6    17    10    +15us[ +18us] +/-  242ms
Install MariaDB dan RabbitMQ (di Controller)
# Install MariaDB
sudo apt-get install -y mariadb-server python3-pymysql

# Konfigurasi MariaDB untuk OpenStack
sudo tee /etc/mysql/mariadb.conf.d/99-openstack.cnf << 'EOF'
[mysqld]
bind-address = 10.0.0.11
default-storage-engine = innodb
innodb_file_per_table = on
max_connections = 4096
collation-server = utf8_general_ci
character-set-server = utf8
EOF

sudo systemctl restart mariadb
sudo systemctl enable mariadb

# Secure installation
sudo mysql_secure_installation
# Jawab:
# Enter current password for root: (kosong, tekan Enter)
# Set root password? Y → masukkan password baru
# Remove anonymous users? Y
# Disallow root login remotely? Y
# Remove test database? Y
# Reload privilege tables? Y

# Install RabbitMQ
sudo apt-get install -y rabbitmq-server

# Buat user openstack di RabbitMQ
sudo rabbitmqctl add_user openstack Secret1234!
sudo rabbitmqctl set_permissions openstack ".*" ".*" ".*"

# Output:
# Adding user "openstack" ...
# Setting permissions for user "openstack" in vhost "/" ...

# Install Memcached
sudo apt-get install -y memcached python3-memcache

# Konfigurasi Memcached agar listen ke IP controller
sudo sed -i 's/-l 127.0.0.1/-l 10.0.0.11/' /etc/memcached.conf
sudo systemctl restart memcached
sudo systemctl enable memcached

# Install etcd
sudo apt-get install -y etcd

sudo tee /etc/default/etcd << 'EOF'
ETCD_NAME="controller"
ETCD_DATA_DIR="/var/lib/etcd"
ETCD_INITIAL_CLUSTER_STATE="new"
ETCD_INITIAL_CLUSTER_TOKEN="etcd-cluster-01"
ETCD_INITIAL_CLUSTER="controller=http://10.0.0.11:2380"
ETCD_INITIAL_ADVERTISE_PEER_URLS="http://10.0.0.11:2380"
ETCD_ADVERTISE_CLIENT_URLS="http://10.0.0.11:2379"
ETCD_LISTEN_PEER_URLS="http://0.0.0.0:2380"
ETCD_LISTEN_CLIENT_URLS="http://10.0.0.11:2379"
EOF

sudo systemctl enable --now etcd
Install Keystone (di Controller)
# Buat database Keystone
sudo mysql -u root -p << 'EOF'
CREATE DATABASE keystone;
GRANT ALL PRIVILEGES ON keystone.* TO 'keystone'@'localhost' IDENTIFIED BY 'Secret1234!';
GRANT ALL PRIVILEGES ON keystone.* TO 'keystone'@'%' IDENTIFIED BY 'Secret1234!';
EOF

# Install paket Keystone
sudo apt-get install -y keystone apache2 libapache2-mod-wsgi-py3

# Edit konfigurasi Keystone
sudo tee /etc/keystone/keystone.conf << 'EOF'
[DEFAULT]
log_dir = /var/log/keystone

[database]
connection = mysql+pymysql://keystone:Secret1234!@controller/keystone

[token]
provider = fernet
EOF

# Populate database Keystone
sudo -u keystone keystone-manage db_sync

# Init Fernet keys
sudo keystone-manage fernet_setup \
  --keystone-user keystone \
  --keystone-group keystone

sudo keystone-manage credential_setup \
  --keystone-user keystone \
  --keystone-group keystone

# Bootstrap Identity service
sudo keystone-manage bootstrap \
  --bootstrap-password Secret1234! \
  --bootstrap-admin-url http://controller:5000/v3/ \
  --bootstrap-internal-url http://controller:5000/v3/ \
  --bootstrap-public-url http://controller:5000/v3/ \
  --bootstrap-region-id RegionOne

# Konfigurasi Apache2
echo "ServerName controller" | sudo tee -a /etc/apache2/apache2.conf
sudo systemctl enable --now apache2

# Verifikasi Keystone
export OS_USERNAME=admin
export OS_PASSWORD=Secret1234!
export OS_PROJECT_NAME=admin
export OS_USER_DOMAIN_NAME=Default
export OS_PROJECT_DOMAIN_NAME=Default
export OS_AUTH_URL=http://controller:5000/v3
export OS_IDENTITY_API_VERSION=3

openstack token issue
# output token seperti di atas → Keystone selesai
Install Glance (di Controller)
# Buat database
sudo mysql -u root -p << 'EOF'
CREATE DATABASE glance;
GRANT ALL PRIVILEGES ON glance.* TO 'glance'@'localhost' IDENTIFIED BY 'Secret1234!';
GRANT ALL PRIVILEGES ON glance.* TO 'glance'@'%' IDENTIFIED BY 'Secret1234!';
EOF

# Buat user dan endpoint Glance di Keystone
openstack user create --domain default --password Secret1234! glance
openstack role add --project service --user glance admin
openstack service create --name glance --description "OpenStack Image" image

openstack endpoint create --region RegionOne image public http://controller:9292
openstack endpoint create --region RegionOne image internal http://controller:9292
openstack endpoint create --region RegionOne image admin http://controller:9292

# Output contoh endpoint create:
# +--------------+----------------------------------+
# | Field        | Value                            |
# +--------------+----------------------------------+
# | enabled      | True                             |
# | id           | 3c1e5aba-5a3e-4c11-bcba-...     |
# | interface    | public                           |
# | region       | RegionOne                        |
# | service_id   | 8c2faff7-...                     |
# | service_name | glance                           |
# | service_type | image                            |
# | url          | http://controller:9292           |
# +--------------+----------------------------------+

# Install Glance
sudo apt-get install -y glance

# Konfigurasi
sudo tee /etc/glance/glance-api.conf << 'EOF'
[DEFAULT]
[database]
connection = mysql+pymysql://glance:Secret1234!@controller/glance

[keystone_authtoken]
www_authenticate_uri = http://controller:5000
auth_url = http://controller:5000
memcached_servers = controller:11211
auth_type = password
project_domain_name = Default
user_domain_name = Default
project_name = service
username = glance
password = Secret1234!

[paste_deploy]
flavor = keystone

[glance_store]
stores = file,http
default_store = file
filesystem_store_datadir = /var/lib/glance/images/
EOF

# Populate database
sudo -u glance glance-manage db_sync

# Start Glance
sudo systemctl enable --now glance-api

# Verifikasi
openstack image list
# Output: (kosong, belum ada image — normal)
# +----+------+--------+
# | ID | Name | Status |
# +----+------+--------+
# +----+------+--------+
Install Nova (di Controller)
# Buat database
sudo mysql -u root -p << 'EOF'
CREATE DATABASE nova_api;
CREATE DATABASE nova;
CREATE DATABASE nova_cell0;
GRANT ALL PRIVILEGES ON nova_api.* TO 'nova'@'localhost' IDENTIFIED BY 'Secret1234!';
GRANT ALL PRIVILEGES ON nova_api.* TO 'nova'@'%' IDENTIFIED BY 'Secret1234!';
GRANT ALL PRIVILEGES ON nova.* TO 'nova'@'localhost' IDENTIFIED BY 'Secret1234!';
GRANT ALL PRIVILEGES ON nova.* TO 'nova'@'%' IDENTIFIED BY 'Secret1234!';
GRANT ALL PRIVILEGES ON nova_cell0.* TO 'nova'@'localhost' IDENTIFIED BY 'Secret1234!';
GRANT ALL PRIVILEGES ON nova_cell0.* TO 'nova'@'%' IDENTIFIED BY 'Secret1234!';
EOF

# Buat user, service, endpoint di Keystone
openstack user create --domain default --password Secret1234! nova
openstack role add --project service --user nova admin
openstack service create --name nova --description "OpenStack Compute" compute

openstack endpoint create --region RegionOne compute public http://controller:8774/v2.1
openstack endpoint create --region RegionOne compute internal http://controller:8774/v2.1
openstack endpoint create --region RegionOne compute admin http://controller:8774/v2.1

# Buat user placement
openstack user create --domain default --password Secret1234! placement
openstack role add --project service --user placement admin
openstack service create --name placement --description "Placement API" placement

openstack endpoint create --region RegionOne placement public http://controller:8778
openstack endpoint create --region RegionOne placement internal http://controller:8778
openstack endpoint create --region RegionOne placement admin http://controller:8778

# Install paket
sudo apt-get install -y nova-api nova-conductor nova-novncproxy \
  nova-scheduler nova-placement-api placement-api

# Konfigurasi /etc/nova/nova.conf (ringkasan bagian terpenting)
sudo tee /etc/nova/nova.conf << 'EOF'
[DEFAULT]
enabled_apis = osapi_compute,metadata
transport_url = rabbit://openstack:Secret1234!@controller:5672/
my_ip = 10.0.0.11
use_neutron = true
firewall_driver = nova.virt.firewall.NoopFirewallDriver

[api_database]
connection = mysql+pymysql://nova:Secret1234!@controller/nova_api

[database]
connection = mysql+pymysql://nova:Secret1234!@controller/nova

[api]
auth_strategy = keystone

[keystone_authtoken]
www_authenticate_uri = http://controller:5000/
auth_url = http://controller:5000/
memcached_servers = controller:11211
auth_type = password
project_domain_name = Default
user_domain_name = Default
project_name = service
username = nova
password = Secret1234!

[neutron]
auth_url = http://controller:5000
auth_type = password
project_domain_name = Default
user_domain_name = Default
region_name = RegionOne
project_name = service
username = neutron
password = Secret1234!
service_metadata_proxy = true
metadata_proxy_shared_secret = MetaSecret123

[vnc]
enabled = true
server_listen = $my_ip
server_proxyclient_address = $my_ip

[glance]
api_servers = http://controller:9292

[oslo_concurrency]
lock_path = /var/lib/nova/tmp

[placement]
region_name = RegionOne
project_domain_name = Default
project_name = service
auth_type = password
user_domain_name = Default
auth_url = http://controller:5000/v3
username = placement
password = Secret1234!
EOF

# Populate database
sudo nova-manage api_db sync
sudo nova-manage cell_v2 map_cell0
sudo nova-manage cell_v2 create_cell --name=cell1 --verbose
sudo nova-manage db sync

# Verifikasi cell
sudo nova-manage cell_v2 list_cells
# Output:
# +-------+--------------------------------------+----------------------------------------+
# |  Name |                 UUID                 |              Transport URL              |
# +-------+--------------------------------------+----------------------------------------+
# | cell0 | 00000000-0000-0000-0000-000000000000 |                 none:/                 |
# | cell1 | 0a253206-...                          | rabbit://openstack:****@controller/    |
# +-------+--------------------------------------+----------------------------------------+

# Start semua service Nova di controller
sudo systemctl enable --now \
  nova-api nova-scheduler nova-conductor nova-novncproxy

# Verifikasi
openstack compute service list
# Output:
# +----+----------------+------------+----------+---------+-------+
# | ID | Binary         | Host       | Zone     | Status  | State |
# +----+----------------+------------+----------+---------+-------+
# |  1 | nova-conductor | controller | internal | enabled | up    |
# |  2 | nova-scheduler | controller | internal | enabled | up    |
# +----+----------------+------------+----------+---------+-------+
Install Nova Compute (di compute1)
# Lakukan di server compute1
sudo apt-get install -y nova-compute

# Cek apakah hardware virtualization tersedia
egrep -c '(vmx|svm)' /proc/cpuinfo
# Kalau hasilnya > 0, bisa pakai KVM (kvm)
# Kalau 0 (nested VM/VPS), harus pakai QEMU (qemu)

# Konfigurasi nova.conf di compute1
sudo tee /etc/nova/nova.conf << 'EOF'
[DEFAULT]
enabled_apis = osapi_compute,metadata
transport_url = rabbit://openstack:Secret1234!@controller:5672/
my_ip = 10.0.0.31
use_neutron = true
firewall_driver = nova.virt.firewall.NoopFirewallDriver

[api]
auth_strategy = keystone

[keystone_authtoken]
www_authenticate_uri = http://controller:5000/
auth_url = http://controller:5000/
memcached_servers = controller:11211
auth_type = password
project_domain_name = Default
user_domain_name = Default
project_name = service
username = nova
password = Secret1234!

[vnc]
enabled = true
server_listen = 0.0.0.0
server_proxyclient_address = $my_ip
novncproxy_base_url = http://controller:6080/vnc_auto.html

[glance]
api_servers = http://controller:9292

[oslo_concurrency]
lock_path = /var/lib/nova/tmp

[placement]
region_name = RegionOne
project_domain_name = Default
project_name = service
auth_type = password
user_domain_name = Default
auth_url = http://controller:5000/v3
username = placement
password = Secret1234!

[libvirt]
# Kalau CPU support VT-x/SVM:
virt_type = kvm
# Kalau tidak (VPS/nested):
# virt_type = qemu
EOF

sudo systemctl enable --now nova-compute

# Kembali ke controller: discover compute node baru
sudo nova-manage cell_v2 discover_hosts --verbose
# Output:
# Found 2 cell mappings.
# Skipping cell0 since it does not contain hosts.
# Getting computes from cell 'cell1': 0a253206-...
# Checking host mapping for compute host 'compute1': ...
# Creating host mapping for compute host 'compute1': ...
# Found 1 unmapped computes in cell: 0a253206-...

# Verifikasi compute node terdaftar
openstack compute service list
# Output:
# +----+----------------+------------+------+---------+-------+
# | ID | Binary         | Host       | Zone | Status  | State |
# +----+----------------+------------+------+---------+-------+
# |  1 | nova-conductor | controller | int  | enabled | up    |
# |  2 | nova-scheduler | controller | int  | enabled | up    |
# |  3 | nova-compute   | compute1   | nova | enabled | up    |  ← ini
# +----+----------------+------------+------+---------+-------+
Install Neutron (Controller dan Compute1)
# ======= Di Controller =======
# Buat database
sudo mysql -u root -p << 'EOF'
CREATE DATABASE neutron;
GRANT ALL PRIVILEGES ON neutron.* TO 'neutron'@'localhost' IDENTIFIED BY 'Secret1234!';
GRANT ALL PRIVILEGES ON neutron.* TO 'neutron'@'%' IDENTIFIED BY 'Secret1234!';
EOF

# User dan endpoint
openstack user create --domain default --password Secret1234! neutron
openstack role add --project service --user neutron admin
openstack service create --name neutron --description "OpenStack Networking" network

openstack endpoint create --region RegionOne network public http://controller:9696
openstack endpoint create --region RegionOne network internal http://controller:9696
openstack endpoint create --region RegionOne network admin http://controller:9696

# Install Neutron dengan ML2 plugin dan LinuxBridge agent
sudo apt-get install -y neutron-server neutron-plugin-ml2 \
  neutron-linuxbridge-agent neutron-l3-agent neutron-dhcp-agent \
  neutron-metadata-agent

# Konfigurasi /etc/neutron/neutron.conf
sudo tee /etc/neutron/neutron.conf << 'EOF'
[DEFAULT]
core_plugin = ml2
service_plugins = router
transport_url = rabbit://openstack:Secret1234!@controller
auth_strategy = keystone
notify_nova_on_port_status_changes = true
notify_nova_on_port_data_changes = true

[database]
connection = mysql+pymysql://neutron:Secret1234!@controller/neutron

[keystone_authtoken]
www_authenticate_uri = http://controller:5000
auth_url = http://controller:5000
memcached_servers = controller:11211
auth_type = password
project_domain_name = Default
user_domain_name = Default
project_name = service
username = neutron
password = Secret1234!

[nova]
auth_url = http://controller:5000
auth_type = password
project_domain_name = Default
user_domain_name = Default
region_name = RegionOne
project_name = service
username = nova
password = Secret1234!

[oslo_concurrency]
lock_path = /var/lib/neutron/tmp
EOF

# Konfigurasi ML2 plugin
sudo tee /etc/neutron/plugins/ml2/ml2_conf.ini << 'EOF'
[ml2]
type_drivers = flat,vlan,vxlan
tenant_network_types = vxlan
mechanism_drivers = linuxbridge,l2population
extension_drivers = port_security

[ml2_type_flat]
flat_networks = provider

[ml2_type_vxlan]
vni_ranges = 1:1000

[securitygroup]
enable_ipset = true
EOF

# Konfigurasi LinuxBridge agent
PROVIDER_IFACE=eth0   # interface yang terhubung ke external network
sudo tee /etc/neutron/plugins/ml2/linuxbridge_agent.ini << EOF
[linux_bridge]
physical_interface_mappings = provider:${PROVIDER_IFACE}

[vxlan]
enable_vxlan = true
local_ip = 10.0.0.11
l2_population = true

[securitygroup]
enable_security_group = true
firewall_driver = neutron.agent.linux.iptables_firewall.IptablesFirewallDriver
EOF

# Konfigurasi L3 agent
sudo tee /etc/neutron/l3_agent.ini << 'EOF'
[DEFAULT]
interface_driver = linuxbridge
EOF

# Konfigurasi DHCP agent
sudo tee /etc/neutron/dhcp_agent.ini << 'EOF'
[DEFAULT]
interface_driver = linuxbridge
dhcp_driver = neutron.agent.linux.dhcp.Dnsmasq
enable_isolated_metadata = true
EOF

# Konfigurasi metadata agent
sudo tee /etc/neutron/metadata_agent.ini << 'EOF'
[DEFAULT]
nova_metadata_host = controller
metadata_proxy_shared_secret = MetaSecret123
EOF

# Populate database Neutron
sudo neutron-db-manage --config-file /etc/neutron/neutron.conf \
  --config-file /etc/neutron/plugins/ml2/ml2_conf.ini \
  upgrade head

# Restart Nova API agar nova-neutron integration aktif
sudo systemctl restart nova-api

# Start semua service Neutron di controller
sudo systemctl enable --now \
  neutron-server neutron-linuxbridge-agent \
  neutron-dhcp-agent neutron-metadata-agent neutron-l3-agent

# Verifikasi
openstack network agent list
# Output:
# +------+--------------------+------------+-------------------+-------+-------+
# | ID   | Agent Type         | Host       | Availability Zone | Alive | State |
# +------+--------------------+------------+-------------------+-------+-------+
# | ...  | Linux bridge agent | controller | None              | True  | UP    |
# | ...  | DHCP agent         | controller | nova              | True  | UP    |
# | ...  | L3 agent           | controller | nova              | True  | UP    |
# | ...  | Metadata agent     | controller | None              | True  | UP    |
# +------+--------------------+------------+-------------------+-------+-------+
# ======= Di Compute1 =======
sudo apt-get install -y neutron-linuxbridge-agent

PROVIDER_IFACE=eth0
sudo tee /etc/neutron/neutron.conf << 'EOF'
[DEFAULT]
transport_url = rabbit://openstack:Secret1234!@controller
auth_strategy = keystone

[keystone_authtoken]
www_authenticate_uri = http://controller:5000
auth_url = http://controller:5000
memcached_servers = controller:11211
auth_type = password
project_domain_name = Default
user_domain_name = Default
project_name = service
username = neutron
password = Secret1234!

[oslo_concurrency]
lock_path = /var/lib/neutron/tmp
EOF

sudo tee /etc/neutron/plugins/ml2/linuxbridge_agent.ini << EOF
[linux_bridge]
physical_interface_mappings = provider:${PROVIDER_IFACE}

[vxlan]
enable_vxlan = true
local_ip = 10.0.0.31
l2_population = true

[securitygroup]
enable_security_group = true
firewall_driver = neutron.agent.linux.iptables_firewall.IptablesFirewallDriver
EOF

sudo systemctl enable --now neutron-linuxbridge-agent

# Kembali ke controller, cek agent compute1 sudah muncul
openstack network agent list | grep compute1
# +------+--------------------+----------+------+-------+-------+
# | ...  | Linux bridge agent | compute1 | None | True  | UP    |
# +------+--------------------+----------+------+-------+-------+
4. Lab: Manajemen Identity (Keystone)
# Lihat semua project
openstack project list

# Output:
# +----------------------------------+---------+
# | ID                               | Name    |
# +----------------------------------+---------+
# | a1b2c3d4e5f678901234567890abcdef | admin   |
# | b2c3d4e5f678901234567890abcdef01 | demo    |
# | c3d4e5f678901234567890abcdef0123 | service |
# +----------------------------------+---------+

# Buat project baru
openstack project create \
  --domain Default \
  --description "Development Team" \
  dev-team

# Buat user baru
openstack user create \
  --domain Default \
  --password "DevPass123!" \
  ali-dev

# Assign role
openstack role add --project dev-team --user ali-dev member

# Cek role assignment
openstack role assignment list --user ali-dev --project dev-team --names
# +--------+---------+-------+----------+--------+-----------+
# | Role   | User    | Group | Project  | Domain | Inherited |
# +--------+---------+-------+----------+--------+-----------+
# | member | ali-dev |       | dev-team |        | False     |
# +--------+---------+-------+----------+--------+-----------+
5. Lab: Image Management (Glance)
# Download Ubuntu 22.04 cloud image
wget https://cloud-images.ubuntu.com/jammy/current/jammy-server-cloudimg-amd64.img \
  -O /tmp/ubuntu-22.04.img

# Upload ke Glance
openstack image create \
  --disk-format qcow2 \
  --container-format bare \
  --file /tmp/ubuntu-22.04.img \
  --public \
  --min-ram 512 \
  --min-disk 5 \
  "Ubuntu 22.04 LTS"

# Output:
# +------------------+----------------------------------------------+
# | Field            | Value                                        |
# +------------------+----------------------------------------------+
# | container_format | bare                                         |
# | disk_format      | qcow2                                        |
# | id               | f1e2d3c4-b5a6-7890-abcd-ef0123456789         |
# | min_disk         | 5                                            |
# | min_ram          | 512                                          |
# | name             | Ubuntu 22.04 LTS                             |
# | size             | 676495360                                    |
# | status           | active                                       |
# | visibility       | public                                       |
# +------------------+----------------------------------------------+

# List image
openstack image list
# +--------------------------------------+------------------+--------+
# | ID                                   | Name             | Status |
# +--------------------------------------+------------------+--------+
# | f1e2d3c4-b5a6-7890-abcd-ef0123456789 | Ubuntu 22.04 LTS | active |
# | a2b3c4d5-e6f7-8901-bcde-f01234567890 | CirrOS 0.6.1     | active |
# +--------------------------------------+------------------+--------+
6. Lab: Buat VM (Nova + Neutron)
# Buat keypair dari public key yang sudah ada
openstack keypair create --public-key ~/.ssh/id_ed25519.pub my-key

# Buat internal network
openstack network create --provider-network-type vxlan internal-net

openstack subnet create \
  --network internal-net \
  --subnet-range 10.10.0.0/24 \
  --gateway 10.10.0.1 \
  --dns-nameserver 8.8.8.8 \
  internal-subnet

# Buat router dan hubungkan ke external + internal
openstack router create internal-router
openstack router set --external-gateway public internal-router
openstack router add subnet internal-router internal-subnet

# Security group untuk SSH
openstack security group create --description "Allow SSH" dev-sg
openstack security group rule create --protocol tcp --dst-port 22 --remote-ip 0.0.0.0/0 dev-sg
openstack security group rule create --protocol icmp dev-sg

# Buat VM
openstack server create \
  --flavor m1.small \
  --image "Ubuntu 22.04 LTS" \
  --key-name my-key \
  --network internal-net \
  --security-group dev-sg \
  my-vm-01

# Monitor sampai status ACTIVE
watch -n 2 "openstack server show my-vm-01 | grep -E 'status|addresses|task_state'"

# Output saat build:
# | OS-EXT-STS:task_state | spawning    |
# | OS-EXT-STS:vm_state   | building    |
# | status                | BUILD       |

# Output saat selesai:
# | OS-EXT-STS:task_state | None        |
# | OS-EXT-STS:vm_state   | active      |
# | addresses             | internal-net=10.10.0.5 |
# | status                | ACTIVE      |

# Assign floating IP
openstack floating ip create public
# | floating_ip_address | 203.0.113.10 |

openstack server add floating ip my-vm-01 203.0.113.10

# SSH ke VM
ssh ubuntu@203.0.113.10 -i ~/.ssh/id_ed25519
# ubuntu@my-vm-01:~$
7. Lab: Block Storage (Cinder)
# Buat volume
openstack volume create --size 20 my-data-vol

# Attach ke VM
openstack server add volume --device /dev/vdb my-vm-01 my-data-vol

# Di dalam VM:
sudo mkfs.ext4 /dev/vdb
sudo mkdir /mnt/data
sudo mount /dev/vdb /mnt/data

df -h /mnt/data
# Filesystem      Size  Used Avail Use% Mounted on
# /dev/vdb         20G   44M   19G   1% /mnt/data

# Mount otomatis saat reboot
echo "/dev/vdb /mnt/data ext4 defaults 0 0" | sudo tee -a /etc/fstab
8. Orchestration dengan Heat
Heat memungkinkan deploy seluruh infrastruktur dari satu file template (HOT — Heat Orchestration Template).
# web-stack.yaml
heat_template_version: 2018-08-31

parameters:
  key_name:
    type: string
    default: my-key
  image:
    type: string
    default: "Ubuntu 22.04 LTS"
  flavor:
    type: string
    default: m1.small

resources:
  web_sg:
    type: OS::Neutron::SecurityGroup
    properties:
      rules:
        - protocol: tcp
          port_range_min: 22
          port_range_max: 22
        - protocol: tcp
          port_range_min: 80
          port_range_max: 80
        - protocol: icmp

  private_net:
    type: OS::Neutron::Net

  private_subnet:
    type: OS::Neutron::Subnet
    properties:
      network: { get_resource: private_net }
      cidr: 192.168.100.0/24
      dns_nameservers: [8.8.8.8]

  router:
    type: OS::Neutron::Router
    properties:
      external_gateway_info: { network: public }

  router_iface:
    type: OS::Neutron::RouterInterface
    properties:
      router_id: { get_resource: router }
      subnet: { get_resource: private_subnet }

  server:
    type: OS::Nova::Server
    properties:
      image: { get_param: image }
      flavor: { get_param: flavor }
      key_name: { get_param: key_name }
      networks:
        - network: { get_resource: private_net }
      security_groups:
        - { get_resource: web_sg }
      user_data: |
        #!/bin/bash
        apt-get update -y && apt-get install -y nginx
        systemctl enable --now nginx

  fip:
    type: OS::Neutron::FloatingIP
    properties:
      floating_network: public

  fip_assoc:
    type: OS::Neutron::FloatingIPAssociation
    properties:
      floatingip_id: { get_resource: fip }
      port_id: { get_attr: [server, addresses, { get_resource: private_net }, 0, port] }

outputs:
  server_ip:
    value: { get_attr: [fip, floating_ip_address] }
# Deploy stack
openstack stack create --template web-stack.yaml web-stack-01

# Monitor
openstack stack event list --follow web-stack-01
# 2026-03-10 08:01:47 web-stack-01  CREATE_COMPLETE  Stack successfully created

# Ambil output IP
openstack stack output show web-stack-01 server_ip
# | output_value | 203.0.113.25 |

curl http://203.0.113.25
# Welcome to nginx! (atau konten default nginx)

# Hapus stack (semua resource ikut dihapus)
openstack stack delete --wait web-stack-01
9. Object Storage (Swift)
Swift menyimpan data sebagai object — file + metadata. Berbeda dengan block storage (Cinder) yang butuh attach ke VM, Swift bisa diakses langsung via REST API dari mana saja. Cocok untuk backup, media file, log archive, dan static content.
Arsitektur Swift
                   ┌──────────────────┐
                   │   Swift Proxy    │  ← menerima request HTTP
                   └────────┬─────────┘
                            │
           ┌────────────────┼────────────────┐
           │                │                │
    ┌──────▼──────┐  ┌──────▼──────┐  ┌──────▼──────┐
    │ Storage     │  │ Storage     │  │ Storage     │
    │ Node 1      │  │ Node 2      │  │ Node 3      │
    │ zone-1      │  │ zone-2      │  │ zone-3      │
    └─────────────┘  └─────────────┘  └─────────────┘
Swift menyimpan minimal 3 replica dari setiap object (configurable). Kalau satu storage node mati, data tetap bisa diakses dari replica lainnya.
Konsep Dasar Swift
| Konsep | Penjelasan |
|---|---|
| Account | Top level namespace, biasanya satu per project/tenant |
| Container | Mirip "folder" atau "bucket" di S3, tempat object disimpan |
| Object | File + metadata (max default 5GB per object, bisa lebih dengan SLO) |
| Ring | Mapping logic yang menentukan object disimpan di storage node mana |
| Replica | Jumlah copy data (default 3), disebar ke zone berbeda |
| Zone | Isolasi failure domain — bisa beda rack, beda server, beda datacenter |
Lab: Operasi Object Storage
# Buat container (mirip bucket S3)
openstack container create my-backups

# Output:
# +---------------------------------------+-----------+
# | account                               | container |
# +---------------------------------------+-----------+
# | AUTH_a1b2c3d4e5f678901234567890abcdef  | my-backups|
# +---------------------------------------+-----------+

# Upload file ke container
echo "Ini file backup database" > /tmp/db-backup-20260310.sql

openstack object create my-backups /tmp/db-backup-20260310.sql

# Output:
# +---------------------------------+-----------+----------------------------------+
# | object                          | container | etag                             |
# +---------------------------------+-----------+----------------------------------+
# | tmp/db-backup-20260310.sql      | my-backups| d41d8cd98f00b204e9800998ecf8427e |
# +---------------------------------+-----------+----------------------------------+

# Upload dengan nama custom
openstack object create my-backups /tmp/db-backup-20260310.sql   --name backups/db/2026-03-10.sql

# List object dalam container
openstack object list my-backups

# Output:
# +----------------------------+
# | Name                       |
# +----------------------------+
# | backups/db/2026-03-10.sql  |
# | tmp/db-backup-20260310.sql |
# +----------------------------+

# Download object
openstack object save my-backups backups/db/2026-03-10.sql   --file /tmp/restored-backup.sql

cat /tmp/restored-backup.sql
# Ini file backup database

# Lihat metadata object
openstack object show my-backups backups/db/2026-03-10.sql

# Output:
# +----------------+-----------------------------------+
# | Field          | Value                             |
# +----------------+-----------------------------------+
# | account        | AUTH_a1b2c3d4e5...                |
# | container      | my-backups                        |
# | content-length | 26                                |
# | content-type   | application/octet-stream          |
# | etag           | d41d8cd98f00b204e9800998ecf8427e  |
# | last-modified  | Mon, 10 Mar 2026 08:30:00 GMT     |
# | object         | backups/db/2026-03-10.sql         |
# +----------------+-----------------------------------+

# Set metadata custom ke object
openstack object set my-backups backups/db/2026-03-10.sql   --property backup-type=full   --property database=production

# Hapus object
openstack object delete my-backups tmp/db-backup-20260310.sql

# Hapus container (harus kosong dulu)
openstack object delete my-backups backups/db/2026-03-10.sql
openstack container delete my-backups
Upload File Besar (> 5GB) dengan SLO
Swift punya limit 5GB per single object upload. Untuk file lebih besar, pakai Static Large Object (SLO) — file dipecah jadi segment, lalu dirangkai kembali saat download.
# Install swift CLI tool tambahan
pip install python-swiftclient

# Upload file besar (misalnya disk image 10GB)
# --segment-size 1073741824 = pecah per 1GB segment
swift upload my-images --segment-size 1073741824   /tmp/large-disk-image.raw

# Output:
# large-disk-image.raw segment 0
# large-disk-image.raw segment 1
# large-disk-image.raw segment 2
# ...
# large-disk-image.raw segment 9
# large-disk-image.raw

# Swift otomatis buat manifest yang menghubungkan semua segment
# Download kembali — muncul sebagai satu file utuh
swift download my-images large-disk-image.raw -o /tmp/downloaded.raw

# Verifikasi integritas
md5sum /tmp/large-disk-image.raw /tmp/downloaded.raw
# hash harus sama
Akses Swift via cURL (REST API)
# Dapatkan token dan storage URL
TOKEN=$(openstack token issue -f value -c id)
SWIFT_URL=$(openstack catalog show object-store -f value -c endpoints |   grep public | awk '{print $2}')

# List containers via REST
curl -s -H "X-Auth-Token: $TOKEN" $SWIFT_URL | python3 -m json.tool

# Upload via REST
curl -X PUT   -H "X-Auth-Token: $TOKEN"   -H "Content-Type: text/plain"   -d "Hello from REST API"   "$SWIFT_URL/my-backups/hello.txt"

# Download via REST
curl -s -H "X-Auth-Token: $TOKEN" "$SWIFT_URL/my-backups/hello.txt"
# Hello from REST API
10. Cinder Advanced — Snapshot, Backup, Multi-Backend
Volume Snapshot
Snapshot menangkap state volume pada satu titik waktu. Berguna untuk backup sebelum upgrade atau perubahan besar.
# Buat snapshot dari volume yang sudah ada
openstack volume snapshot create   --volume my-data-vol   --description "Before database upgrade"   snap-before-upgrade

# Output:
# +-------------+--------------------------------------+
# | Field       | Value                                |
# +-------------+--------------------------------------+
# | created_at  | 2026-03-10T09:00:00.000000           |
# | description | Before database upgrade              |
# | id          | 55555555-6666-7777-8888-999999999999 |
# | name        | snap-before-upgrade                  |
# | size        | 20                                   |
# | status      | available                            |
# | volume_id   | 44444444-5555-6666-7777-888888888888 |
# +-------------+--------------------------------------+

# List semua snapshot
openstack volume snapshot list

# Output:
# +------------------+---------------------+-----------+------+--------+
# | ID               | Name                | Description | Size | Status |
# +------------------+---------------------+-----------+------+--------+
# | 55555555-6666... | snap-before-upgrade | Before... |   20 | avail  |
# +------------------+---------------------+-----------+------+--------+

# Buat volume baru dari snapshot (untuk restore)
openstack volume create   --snapshot snap-before-upgrade   --size 20   restored-data-vol

# Volume ini bisa di-attach ke VM lain untuk verifikasi data
openstack server add volume --device /dev/vdc my-vm-01 restored-data-vol
Volume Backup ke Swift
Backup menyimpan copy volume ke object storage (Swift), terpisah dari storage pool Cinder. Lebih aman karena beda infrastruktur.
# Backup volume ke Swift
openstack volume backup create   --name backup-data-vol-20260310   --description "Daily backup"   my-data-vol

# Output:
# +------------+--------------------------------------+
# | Field      | Value                                |
# +------------+--------------------------------------+
# | id         | aaaabbbb-cccc-dddd-eeee-ffffffffffff |
# | name       | backup-data-vol-20260310             |
# | size       | 20                                   |
# | status     | creating                             |
# | volume_id  | 44444444-5555-6666-7777-888888888888 |
# +------------+--------------------------------------+

# Monitor backup progress
openstack volume backup show backup-data-vol-20260310 | grep status
# creating → available (tunggu beberapa menit tergantung ukuran)

# List backups
openstack volume backup list
# +--------------------------------------+---------------------------+--------+------+
# | ID                                   | Name                      | Status | Size |
# +--------------------------------------+---------------------------+--------+------+
# | aaaabbbb-cccc-dddd-eeee-ffffffffffff | backup-data-vol-20260310  | avail  |   20 |
# +--------------------------------------+---------------------------+--------+------+

# Restore backup ke volume baru
openstack volume backup restore   backup-data-vol-20260310   restored-from-backup

# Output:
# +-------------+--------------------------------------+
# | Field       | Value                                |
# +-------------+--------------------------------------+
# | backup_id   | aaaabbbb-cccc-dddd-eeee-ffffffffffff |
# | volume_id   | new-vol-id-here                      |
# | volume_name | restored-from-backup                 |
# +-------------+--------------------------------------+
Volume Transfer antar Project
Kalau ingin pindahkan volume dari satu project ke project lain:
# Di project asal — buat transfer request
openstack volume transfer request create my-data-vol

# Output:
# +------------+--------------------------------------+
# | Field      | Value                                |
# +------------+--------------------------------------+
# | auth_key   | 3b16a7c8d9e0f1a2                     |  ← simpan ini!
# | id         | bbbbcccc-dddd-eeee-ffff-111111111111 |
# | name       | None                                 |
# | volume_id  | 44444444-5555-6666-7777-888888888888 |
# +------------+--------------------------------------+

# Di project tujuan — accept transfer
openstack volume transfer request accept   --auth-key 3b16a7c8d9e0f1a2   bbbbcccc-dddd-eeee-ffff-111111111111

# Volume sekarang milik project tujuan
Multi-Backend Storage
Di production, biasanya ada beberapa tipe storage: SSD cepat untuk database, HDD besar untuk archive. Cinder bisa dikonfigurasi dengan multiple backend.
# /etc/cinder/cinder.conf
[DEFAULT]
enabled_backends = ssd-pool,hdd-pool

[ssd-pool]
volume_driver = cinder.volume.drivers.lvm.LVMVolumeDriver
volume_group = cinder-ssd-vg
volume_backend_name = SSD_FAST
iscsi_ip_address = 10.0.0.41
iscsi_protocol = iscsi

[hdd-pool]
volume_driver = cinder.volume.drivers.lvm.LVMVolumeDriver
volume_group = cinder-hdd-vg
volume_backend_name = HDD_LARGE
iscsi_ip_address = 10.0.0.41
iscsi_protocol = iscsi
# Buat volume type untuk tiap backend
openstack volume type create --property volume_backend_name=SSD_FAST ssd-fast
openstack volume type create --property volume_backend_name=HDD_LARGE hdd-large

# Buat volume di backend SSD
openstack volume create --size 50 --type ssd-fast db-volume

# Buat volume di backend HDD
openstack volume create --size 500 --type hdd-large archive-volume

# Cek volume type yang dipakai
openstack volume show db-volume | grep type
# | type | ssd-fast |

openstack volume show archive-volume | grep type
# | type | hdd-large |
Volume Extend (Resize)
# Perbesar volume dari 20GB ke 50GB
# Volume harus dalam status available (detach dulu dari VM)
openstack server remove volume my-vm-01 my-data-vol

openstack volume set --size 50 my-data-vol

# Re-attach
openstack server add volume --device /dev/vdb my-vm-01 my-data-vol

# Di dalam VM: resize filesystem
sudo resize2fs /dev/vdb
# resize2fs 1.46.5 (30-Dec-2021)
# Filesystem at /dev/vdb is mounted on /mnt/data; on-line resizing required
# old_desc_blocks = 3, new_desc_blocks = 7
# The filesystem on /dev/vdb is now 13107200 (4k) blocks long.

df -h /mnt/data
# Filesystem      Size  Used Avail Use% Mounted on
# /dev/vdb         50G   44M   47G   1% /mnt/data
11. Neutron Advanced — VXLAN, DVR, OVS vs OVN
Perbandingan Network Backend
| Aspek | LinuxBridge | Open vSwitch (OVS) | OVN |
|---|---|---|---|
| Kompleksitas | Rendah | Menengah | Tinggi (tapi auto-managed) |
| Performa | Baik | Sangat baik | Terbaik |
| DVR support | Tidak | Ya | Ya (native) |
| DPDK support | Tidak | Ya | Ya |
| L3 routing | Via L3 agent | Via L3 agent | Distributed native |
| Firewall | iptables | iptables/conntrack | OVN ACL (lebih cepat) |
| Scale | Kecil-menengah | Menengah-besar | Besar |
| Maintenance | Mudah | Sedang | Otomatis |
Diagnosis Network Problem
Ini hal yang paling sering ditanyakan beginner: "VM saya tidak bisa ping keluar."
# === Step 1: Cek security group VM ===
openstack server show my-vm-01 -f value -c security_groups
# [{'name': 'default'}]

openstack security group rule list default
# Pastikan ada rule ICMP egress dan ingress yang sesuai

# Tambahkan rule ICMP jika belum ada
openstack security group rule create   --protocol icmp   --ingress   default

openstack security group rule create   --protocol icmp   --egress   default

# === Step 2: Cek IP assignment ===
openstack server show my-vm-01 -f value -c addresses
# internal-net=10.10.0.5

# === Step 3: Cek port di Neutron ===
openstack port list --server my-vm-01

# Output:
# +--------------------------------------+------+-------------------+-----------------------------------+--------+
# | ID                                   | Name | MAC Address       | Fixed IP Addresses                | Status |
# +--------------------------------------+------+-------------------+-----------------------------------+--------+
# | aabb1122-...                         |      | fa:16:3e:ab:cd:ef | ip_address='10.10.0.5', subnet.. | ACTIVE |
# +--------------------------------------+------+-------------------+-----------------------------------+--------+

# === Step 4: Cek router sudah benar ===
openstack router show internal-router

# Pastikan:
# - external_gateway_info tidak kosong
# - interfaces ada subnet yang benar

openstack router show internal-router -f value -c external_gateway_info
# {'network_id': '11111111-2222-...', 'enable_snat': True, ...}

# === Step 5: Cek di dalam network namespace ===
# (jalankan di controller/network node sebagai root)

sudo ip netns list
# qrouter-xxxx-yyyy      (ID router Neutron)
# qdhcp-zzzz-wwww        (DHCP agent)

ROUTER_NS=$(sudo ip netns list | grep qrouter | awk '{print $1}')

# Cek interface dalam namespace router
sudo ip netns exec $ROUTER_NS ip addr
# Output menunjukkan interface qr-xxx (internal) dan qg-xxx (external)

# Cek routing table di namespace
sudo ip netns exec $ROUTER_NS ip route
# default via 203.0.113.1 dev qg-abcdef01-23
# 10.10.0.0/24 dev qr-12345678-90

# Ping dari namespace router ke internet
sudo ip netns exec $ROUTER_NS ping -c 3 8.8.8.8
# PING 8.8.8.8 (8.8.8.8) 56(84) bytes of data.
# 64 bytes from 8.8.8.8: icmp_seq=1 ttl=118 time=1.23 ms
# Kalau ini berhasil tapi VM tidak bisa, masalahnya di security group atau DHCP

# Ping dari namespace router ke VM
sudo ip netns exec $ROUTER_NS ping -c 3 10.10.0.5
# Harus berhasil

# === Step 6: Cek IP forwarding di host ===
sysctl net.ipv4.ip_forward
# net.ipv4.ip_forward = 1    ← harus 1

# Kalau 0, aktifkan:
sudo sysctl -w net.ipv4.ip_forward=1
echo "net.ipv4.ip_forward=1" | sudo tee -a /etc/sysctl.conf

# === Step 7: Cek bridge mapping (LinuxBridge) ===
cat /etc/neutron/plugins/ml2/linuxbridge_agent.ini | grep physical_interface
# physical_interface_mappings = provider:eth0
# Pastikan interface nama-nya benar

# Check bridge
brctl show
# bridge name     bridge id             STP enabled  interfaces
# brq77777777     8000.xxxxxxxxxxxx     no           eth0
#                                                    vxlan-100
#                                                    tap-xxxxxxxx
DVR (Distributed Virtual Router)
Tanpa DVR, semua traffic East-West (antar VM di compute node berbeda) dan North-South (VM ke internet) harus melewati network node. Ini jadi bottleneck.
Dengan DVR, setiap compute node punya router namespace sendiri, sehingga traffic antar VM dan floating IP traffic langsung di-handle di compute node tanpa melewati network node.
# Aktifkan DVR di /etc/neutron/neutron.conf (controller)
[DEFAULT]
router_distributed = True

# Di /etc/neutron/l3_agent.ini (semua node)
[DEFAULT]
agent_mode = dvr_snat    # di network/controller node
# agent_mode = dvr        # di compute node
# Buat router dengan DVR enabled
openstack router create --distributed internal-router-dvr

# Verifikasi
openstack router show internal-router-dvr | grep distributed
# | distributed | True |
VXLAN Deep Dive
VXLAN (Virtual Extensible LAN) mengenkapsulasi frame Ethernet L2 di dalam paket UDP/IP. Ini memungkinkan network virtual yang terisolasi berjalan di atas network fisik yang sama.
VM1 (10.10.0.5) ──► [OVS Bridge] ──► VXLAN Tunnel ──► [OVS Bridge] ──► VM2 (10.10.0.8)
  compute1                              UDP:4789                           compute2
# Cek VXLAN tunnel yang aktif (di compute node)
sudo ovs-vsctl show
# Bridge br-int
#     Port "vxlan-0a000014"
#         Interface "vxlan-0a000014"
#             type: vxlan
#             options: {df_default="true", in_key=flow, local_ip="10.0.0.31",
#                       out_key=flow, remote_ip="10.0.0.11"}
#     Port "tap-12345678"
#         tag: 1
#         Interface "tap-12345678"

# Cek traffic VXLAN (UDP port 4789)
sudo tcpdump -i eth0 -n port 4789 -c 10
# 09:15:01.123456 IP 10.0.0.31.44321 > 10.0.0.11.4789: VXLAN, flags [I] (0x08)
# 09:15:01.123789 IP 10.0.0.11.55432 > 10.0.0.31.4789: VXLAN, flags [I] (0x08)
12. Nova Advanced — Live Migration, Resize, Evacuation
Live Migration
Pindahkan VM dari satu compute node ke compute node lain tanpa downtime. Berguna saat maintenance hardware.
Syarat live migration:
- Shared storage (NFS atau Ceph) atau block migration (copy disk lewat network)
- Libvirt bisa berkomunikasi antar compute node
- CPU model compatible antar compute node
# Cek VM sedang jalan di compute node mana
openstack server show my-vm-01 -f value -c OS-EXT-SRV-ATTR:host
# compute1

# Live migrate ke compute2
openstack server migrate --live compute2 my-vm-01

# Monitor progress
watch -n 1 "openstack server show my-vm-01 -f value -c status -c OS-EXT-STS:task_state"

# Output selama migrasi:
# ACTIVE
# migrating

# Setelah selesai:
# ACTIVE
# None

# Verifikasi pindah
openstack server show my-vm-01 -f value -c OS-EXT-SRV-ATTR:host
# compute2

# VM tetap accessible selama proses migrasi — downtime minimal (biasanya < 1 detik)
ping 203.0.113.10
# tidak ada packet loss (atau sangat minimal)
Konfigurasi Live Migration
# Di SEMUA compute node, edit libvirtd
sudo tee /etc/libvirt/libvirtd.conf << 'EOF'
listen_tls = 0
listen_tcp = 1
tcp_port = "16509"
listen_addr = "0.0.0.0"
auth_tcp = "none"
EOF

# Edit default libvirt daemon
sudo sed -i 's/#LIBVIRTD_ARGS="--listen"/LIBVIRTD_ARGS="--listen"/'   /etc/default/libvirtd

sudo systemctl restart libvirtd

# Di nova.conf semua compute node
# [libvirt]
# live_migration_uri = qemu+tcp://%s/system
# live_migration_tunnelled = false
Block Migration (tanpa shared storage)
# Kalau tidak ada shared storage, pakai block migration
# Disk di-copy lewat network — lebih lambat tapi tidak butuh NFS/Ceph
openstack server migrate --live compute2 --block-migration my-vm-01
VM Resize (Ubah Flavor)
# Resize dari m1.small ke m1.medium
openstack server resize --flavor m1.medium my-vm-01

# VM akan di-shutdown, disk di-resize, lalu boot ulang di compute node baru
# Status berubah: ACTIVE → RESIZE → VERIFY_RESIZE

# Monitor
watch -n 2 "openstack server show my-vm-01 -f value -c status"

# Setelah VERIFY_RESIZE, konfirmasi atau revert:
# Konfirmasi resize (data baru dipertahankan)
openstack server resize confirm my-vm-01

# Atau revert ke flavor lama
# openstack server resize revert my-vm-01

# Cek flavor baru
openstack server show my-vm-01 -f value -c flavor
# m1.medium
Evacuation (Compute Node Down)
Kalau compute node crash atau tidak bisa diperbaiki, VM bisa di-evacuate ke node lain. Berbeda dengan live migration — VM di sini dalam keadaan down.
# Mark compute node sebagai down
openstack compute service set --disable --disable-reason "Hardware failure"   compute1 nova-compute

# Evacuate semua VM dari compute1
nova host-evacuate compute1

# Atau evacuate satu VM
openstack server evacuate my-vm-01 --host compute2

# Output:
# +----------------------------+--------------------------------------------------+
# | Field                      | Value                                            |
# +----------------------------+--------------------------------------------------+
# | server_uuid                | abc12345-def6-7890-abcd-ef0123456789             |
# | adminPass                  | xyzNewPassword123                                |
# +----------------------------+--------------------------------------------------+

# VM akan di-rebuild di compute2 dari image yang sama
# Data di Cinder volume tetap aman — hanya root disk yang di-rebuild

# Setelah compute1 diperbaiki, enable kembali
openstack compute service set --enable compute1 nova-compute
Shelve dan Unshelve
Shelve = "simpan" VM ke Glance sebagai snapshot, lalu deallocate resource. Berguna untuk VM yang tidak terpakai tapi perlu disimpan state-nya.
# Shelve VM — resources dilepas, disk di-snapshot ke Glance
openstack server shelve my-vm-01

# Status: ACTIVE → SHELVED_OFFLOADED
# Resource compute di-free

# Unshelve — boot kembali dari snapshot
openstack server unshelve my-vm-01

# Status: SHELVED_OFFLOADED → ACTIVE
13. Kolla-Ansible — Deploy Production OpenStack dengan Container
Kolla-Ansible adalah cara yang direkomendasikan untuk deploy OpenStack di production saat ini. Setiap service OpenStack berjalan dalam Docker container, di-manage oleh Ansible playbook. Keunggulan: upgrade lebih bersih (ganti container image, bukan update paket), rollback lebih mudah, dan isolasi antar service lebih baik.
Persiapan
Minimal butuh 2 server (bisa 1 untuk all-in-one):
| Node | Spesifikasi | IP |
|---|---|---|
| deploy | Tempat jalankan ansible (bisa laptop) | 10.0.0.5 |
| controller | Controller + Compute + Storage | 10.0.0.11 |
| compute1 (opsional) | Compute tambahan | 10.0.0.31 |
# ======= Di deploy node =======
# Install dependensi
sudo apt-get update
sudo apt-get install -y python3-dev python3-pip python3-venv   libffi-dev gcc libssl-dev git

# Buat virtualenv
python3 -m venv ~/kolla-venv
source ~/kolla-venv/bin/activate

# Install kolla-ansible (sesuaikan versi OpenStack)
pip install 'ansible-core>=2.14,<2.16'
pip install kolla-ansible

# Buat direktori konfigurasi
sudo mkdir -p /etc/kolla
sudo chown $USER:$USER /etc/kolla

# Copy template konfigurasi
cp -r ~/kolla-venv/share/kolla-ansible/etc_examples/kolla/* /etc/kolla/
cp ~/kolla-venv/share/kolla-ansible/ansible/inventory/all-in-one .
cp ~/kolla-venv/share/kolla-ansible/ansible/inventory/multinode .

# Install Ansible Galaxy requirements
kolla-ansible install-deps
Konfigurasi
# Edit /etc/kolla/globals.yml — ini file konfigurasi utama Kolla
cat > /etc/kolla/globals.yml << 'GLOBALS'
---
# Base options
kolla_base_distro: "ubuntu"
kolla_install_type: "source"
openstack_release: "2024.1"

# Networking
kolla_internal_vip_address: "10.0.0.100"
network_interface: "eth0"
neutron_external_interface: "eth1"
neutron_plugin_agent: "openvswitch"

# Aktifkan service
enable_cinder: "yes"
enable_cinder_backend_lvm: "yes"
enable_horizon: "yes"
enable_heat: "yes"
enable_neutron_provider_networks: "yes"

# Cinder LVM
cinder_volume_group: "cinder-volumes"

# Docker
docker_registry: "quay.io"
docker_namespace: "openstack.kolla"

# Logging
enable_central_logging: "yes"
GLOBALS
# Edit inventory file (untuk all-in-one)
# File all-in-one sudah benar untuk single node

# Untuk multi-node, edit file multinode:
cat > multinode << 'INVENTORY'
[control]
controller ansible_host=10.0.0.11 ansible_user=ubuntu

[network]
controller ansible_host=10.0.0.11 ansible_user=ubuntu

[compute]
compute1 ansible_host=10.0.0.31 ansible_user=ubuntu

[monitoring]
controller ansible_host=10.0.0.11 ansible_user=ubuntu

[storage]
controller ansible_host=10.0.0.11 ansible_user=ubuntu

[deployment]
localhost ansible_connection=local
INVENTORY

# Generate password untuk semua service
kolla-genpwd

# Lihat password yang di-generate
cat /etc/kolla/passwords.yml | head -20
# keystone_admin_password: xyzABC123def
# database_password: abc123XYZ789
# rabbitmq_password: ...
Deploy
# Step 1: Bootstrap target server (install Docker, setup OS)
kolla-ansible -i multinode bootstrap-servers

# Output (ringkasan):
# PLAY [Apply role baremetal] ****
#
# TASK [baremetal : Install docker packages] ****
# changed: [controller]
# changed: [compute1]
#
# TASK [baremetal : Enable docker service] ****
# ok: [controller]
# ok: [compute1]
#
# PLAY RECAP ****
# controller    : ok=45   changed=20   failed=0
# compute1      : ok=35   changed=15   failed=0

# Step 2: Pre-check — validasi semua requirements
kolla-ansible -i multinode prechecks

# Output:
# PLAY [Apply role prechecks] ****
#
# TASK [prechecks : Checking Docker version] ****
# ok: [controller]
# ok: [compute1]
#
# TASK [prechecks : Checking free port for Keystone] ****
# ok: [controller]
#
# PLAY RECAP ****
# controller     : ok=85   changed=0    failed=0
# compute1       : ok=40   changed=0    failed=0

# Step 3: Pull Docker images
kolla-ansible -i multinode pull

# Output (butuh waktu lama, download semua images):
# TASK [Pull kolla/ubuntu-source-keystone image] ****
# changed: [controller]
#
# TASK [Pull kolla/ubuntu-source-nova-api image] ****
# changed: [controller]
# ...

# Step 4: Deploy!
kolla-ansible -i multinode deploy

# Output:
# PLAY [Apply role keystone] ****
#
# TASK [keystone : Starting Keystone container] ****
# changed: [controller]
#
# TASK [keystone : Waiting for Keystone to become available] ****
# ok: [controller]
#
# PLAY [Apply role nova] ****
#
# TASK [nova : Starting nova-api container] ****
# changed: [controller]
#
# TASK [nova : Starting nova-compute container] ****
# changed: [compute1]
# ...
#
# PLAY RECAP ****
# controller     : ok=250  changed=85   failed=0
# compute1       : ok=80   changed=35   failed=0

# Step 5: Post-deploy — buat endpoint dan admin user
kolla-ansible -i multinode post-deploy

# File credential akan dibuat:
# /etc/kolla/admin-openrc.sh

# Load credential
source /etc/kolla/admin-openrc.sh

# Verifikasi
openstack service list
# +----------------------------------+----------+-----------+
# | ID                               | Name     | Type      |
# +----------------------------------+----------+-----------+
# | ...                              | keystone | identity  |
# | ...                              | nova     | compute   |
# | ...                              | neutron  | network   |
# | ...                              | glance   | image     |
# | ...                              | cinder   | volume    |
# | ...                              | cinderv3 | volumev3  |
# | ...                              | heat     | orches..  |
# +----------------------------------+----------+-----------+

# Cek container Docker yang jalan
sudo docker ps --format "table {{.Names}}\t{{.Status}}" | head -20
# NAMES                        STATUS
# keystone                     Up 10 minutes
# nova_api                     Up 8 minutes
# nova_scheduler               Up 8 minutes
# nova_conductor               Up 8 minutes
# nova_novncproxy              Up 8 minutes
# nova_compute                 Up 7 minutes
# neutron_server               Up 7 minutes
# neutron_openvswitch_agent    Up 7 minutes
# neutron_l3_agent             Up 7 minutes
# neutron_dhcp_agent           Up 7 minutes
# neutron_metadata_agent       Up 7 minutes
# glance_api                   Up 9 minutes
# cinder_api                   Up 6 minutes
# cinder_scheduler             Up 6 minutes
# cinder_volume                Up 6 minutes
# horizon                      Up 5 minutes
# rabbitmq                     Up 12 minutes
# mariadb                      Up 12 minutes
# memcached                    Up 12 minutes
Upgrade OpenStack dengan Kolla
# Ganti versi di globals.yml
# openstack_release: "2024.2"   (dari 2024.1)

# Pull image baru
kolla-ansible -i multinode pull

# Upgrade! (rolling per-service)
kolla-ansible -i multinode upgrade

# Output:
# TASK [keystone : Stopping keystone container] ****
# changed: [controller]
#
# TASK [keystone : Starting keystone container with new image] ****
# changed: [controller]
#
# TASK [keystone : Running keystone db_sync] ****
# changed: [controller]
# ...
# (lanjut ke service berikutnya)

# Verifikasi versi
openstack versions show
14. Integrasi Ceph sebagai Backend Storage
Ceph adalah distributed storage system yang bisa menyediakan block storage (RBD), object storage (RADOS Gateway), dan file storage (CephFS) dalam satu cluster. Mayoritas deployment OpenStack production menggunakan Ceph sebagai backend untuk Glance, Cinder, dan Nova ephemeral disk.
Kenapa Ceph untuk OpenStack?
| Aspek | LVM (Default) | Ceph |
|---|---|---|
| Replication | Tidak ada (single disk) | 3x replica otomatis |
| Scale | Vertikal (tambah disk ke server) | Horizontal (tambah server) |
| Live migration support | Butuh NFS atau copy via network | Native (shared RBD) |
| Snapshot | CoW snapshot lokal | Distribusi snapshot |
| Boot from volume | Ya | Ya, lebih cepat (clone) |
| Single point of failure | Ada (disk/server mati = data hilang) | Tidak ada |
Arsitektur Ceph Cluster
                    ┌─────────────────┐
                    │   Ceph Monitor  │  (minimal 3, odd number)
                    │   (ceph-mon)    │  tracking cluster state
                    └────────┬────────┘
                             │
          ┌──────────────────┼──────────────────┐
          │                  │                  │
   ┌──────▼──────┐   ┌──────▼──────┐   ┌──────▼──────┐
   │   OSD 1     │   │   OSD 2     │   │   OSD 3     │
   │  /dev/sdb   │   │  /dev/sdb   │   │  /dev/sdb   │
   │  /dev/sdc   │   │  /dev/sdc   │   │  /dev/sdc   │
   │  ceph-osd   │   │  ceph-osd   │   │  ceph-osd   │
   └─────────────┘   └─────────────┘   └─────────────┘
OSD = Object Storage Daemon. Setiap disk fisik punya satu OSD. Data didistribusikan ke semua OSD berdasarkan algoritma CRUSH.
Install Ceph Cluster (3 Node)
| Node | Role | Disk |
|---|---|---|
| ceph1 (10.0.0.51) | mon, mgr, osd | /dev/sdb, /dev/sdc |
| ceph2 (10.0.0.52) | mon, osd | /dev/sdb, /dev/sdc |
| ceph3 (10.0.0.53) | mon, osd | /dev/sdb, /dev/sdc |
# ======= Di ceph1 (deploy node) =======

# Install cephadm
curl --silent --remote-name --location   https://github.com/ceph/ceph/raw/reef/src/cephadm/cephadm
chmod +x cephadm
sudo mv cephadm /usr/local/bin/

# Bootstrap cluster
sudo cephadm bootstrap \
  --mon-ip 10.0.0.51 \
  --initial-dashboard-password CephAdmin123 \
  --dashboard-password-noupdate

# Output:
# Ceph Dashboard is now available at:
#              URL: https://ceph1:8443/
#             User: admin
#         Password: CephAdmin123
#
# Enabling client.admin keyring and conf on hosts with "admin" label
# Saving cluster configuration to /var/lib/ceph/<fsid>/config
# Enabling autotune for osd_memory_target
# You can access the Ceph CLI as following in case of multi-cluster:
#     sudo /usr/sbin/cephadm shell --fsid <fsid> -c /etc/ceph/ceph.conf
# Or, if you are only running a single cluster:
#     sudo /usr/sbin/cephadm shell
# Please consider enabling telemetry to help improve Ceph:
#     ceph telemetry on

# Install ceph-common untuk CLI
sudo cephadm install ceph-common

# Cek status cluster
sudo ceph -s

# Output:
#   cluster:
#     id:     a1b2c3d4-e5f6-7890-abcd-ef0123456789
#     health: HEALTH_WARN
#             OSD count 0 < osd_pool_default_size 3
#
#   services:
#     mon: 1 daemons, quorum ceph1
#     mgr: ceph1.abcdef(active)
#
#   data:
#     pools:   0 pools, 0 pgs
#     objects: 0 objects, 0 B
#     usage:   0 B used, 0 B / 0 B avail
#     pgs:

# Tambahkan node lain ke cluster
sudo ceph orch host add ceph2 10.0.0.52
sudo ceph orch host add ceph3 10.0.0.53

# Output:
# Added host 'ceph2' with addr '10.0.0.52'
# Added host 'ceph3' with addr '10.0.0.53'

# Deploy monitor ke semua node
sudo ceph orch apply mon --placement="ceph1,ceph2,ceph3"

# Tambahkan semua available disk sebagai OSD
sudo ceph orch apply osd --all-available-devices

# Atau tambahkan disk spesifik
sudo ceph orch daemon add osd ceph1:/dev/sdb
sudo ceph orch daemon add osd ceph1:/dev/sdc
sudo ceph orch daemon add osd ceph2:/dev/sdb
sudo ceph orch daemon add osd ceph2:/dev/sdc
sudo ceph orch daemon add osd ceph3:/dev/sdb
sudo ceph orch daemon add osd ceph3:/dev/sdc

# Cek OSD status
sudo ceph osd tree

# Output:
# ID  CLASS  WEIGHT   TYPE NAME       STATUS  REWEIGHT  PRI-AFF
# -1         5.45679  root default
# -3         1.81893      host ceph1
#  0    hdd  0.90947          osd.0       up   1.00000  1.00000
#  1    hdd  0.90947          osd.1       up   1.00000  1.00000
# -5         1.81893      host ceph2
#  2    hdd  0.90947          osd.2       up   1.00000  1.00000
#  3    hdd  0.90947          osd.3       up   1.00000  1.00000
# -7         1.81893      host ceph3
#  4    hdd  0.90947          osd.4       up   1.00000  1.00000
#  5    hdd  0.90947          osd.5       up   1.00000  1.00000

# Cek cluster health
sudo ceph -s

# Output (healthy cluster):
#   cluster:
#     id:     a1b2c3d4-e5f6-7890-abcd-ef0123456789
#     health: HEALTH_OK
#
#   services:
#     mon: 3 daemons, quorum ceph1,ceph2,ceph3
#     mgr: ceph1.abcdef(active), standbys: ceph2.ghijkl
#     osd: 6 osds: 6 up, 6 in
#
#   data:
#     pools:   1 pools, 1 pgs
#     objects: 0 objects, 0 B
#     usage:   6.1 GiB used, 5.4 TiB / 5.5 TiB avail
#     pgs:     1 active+clean
Konfigurasi Ceph Pool untuk OpenStack
# Buat pool untuk tiap service OpenStack
sudo ceph osd pool create volumes 128      # Cinder
sudo ceph osd pool create images 128       # Glance
sudo ceph osd pool create vms 128          # Nova ephemeral
sudo ceph osd pool create backups 128      # Cinder backup

# Init pool untuk RBD
sudo rbd pool init volumes
sudo rbd pool init images
sudo rbd pool init vms
sudo rbd pool init backups

# Buat ceph user untuk OpenStack
sudo ceph auth get-or-create client.glance \
  mon 'profile rbd' \
  osd 'profile rbd pool=images' \
  mgr 'profile rbd pool=images'

sudo ceph auth get-or-create client.cinder \
  mon 'profile rbd' \
  osd 'profile rbd pool=volumes, profile rbd pool=vms, profile rbd pool=images' \
  mgr 'profile rbd pool=volumes, profile rbd pool=vms, profile rbd pool=images'

sudo ceph auth get-or-create client.cinder-backup \
  mon 'profile rbd' \
  osd 'profile rbd pool=backups' \
  mgr 'profile rbd pool=backups'

# Output contoh:
# [client.glance]
#     key = AQDjxZ1jKl8BOBAAv...==

# Copy keyring ke OpenStack controller/compute node
sudo ceph auth get-or-create client.glance | \
  ssh controller sudo tee /etc/ceph/ceph.client.glance.keyring
sudo ceph auth get-or-create client.cinder | \
  ssh controller sudo tee /etc/ceph/ceph.client.cinder.keyring
sudo ceph auth get-or-create client.cinder | \
  ssh compute1 sudo tee /etc/ceph/ceph.client.cinder.keyring

# Copy ceph.conf ke semua OpenStack node
sudo scp /etc/ceph/ceph.conf controller:/etc/ceph/
sudo scp /etc/ceph/ceph.conf compute1:/etc/ceph/
Konfigurasi Glance dengan Ceph
# /etc/glance/glance-api.conf (di controller)
[DEFAULT]
show_image_direct_url = True

[glance_store]
stores = rbd
default_store = rbd
rbd_store_pool = images
rbd_store_user = glance
rbd_store_ceph_conf = /etc/ceph/ceph.conf
rbd_store_chunk_size = 8
sudo systemctl restart glance-api

# Upload image — otomatis masuk ke Ceph pool 'images'
openstack image create \
  --disk-format qcow2 \
  --container-format bare \
  --file /tmp/ubuntu-22.04.img \
  --public \
  "Ubuntu 22.04 Ceph"

# Verifikasi image ada di Ceph
sudo rbd -p images ls
# f1e2d3c4-b5a6-7890-abcd-ef0123456789

sudo rbd -p images info f1e2d3c4-b5a6-7890-abcd-ef0123456789
# rbd image 'f1e2d3c4-b5a6-7890-abcd-ef0123456789':
#     size 645 MiB in 81 objects
#     order 23 (8 MiB objects)
#     snapshot_count: 1
#     id: 1a2b3c4d5e6f
#     block_name_prefix: rbd_data.1a2b3c4d5e6f
#     format: 2
#     features: layering, exclusive-lock, object-map, fast-diff
Konfigurasi Cinder dengan Ceph
# /etc/cinder/cinder.conf (di controller)
[DEFAULT]
enabled_backends = ceph
default_volume_type = ceph

[ceph]
volume_driver = cinder.volume.drivers.rbd.RBDDriver
volume_backend_name = ceph
rbd_pool = volumes
rbd_ceph_conf = /etc/ceph/ceph.conf
rbd_flatten_volume_from_snapshot = false
rbd_max_clone_depth = 5
rbd_store_chunk_size = 4
rados_connect_timeout = -1
rbd_user = cinder
rbd_secret_uuid = 457eb676-33da-42ec-9a8c-9293d545c337
# Generate UUID untuk libvirt secret (di setiap compute node)
UUID=457eb676-33da-42ec-9a8c-9293d545c337

# Buat secret XML
cat > /tmp/secret.xml << EOF
<secret ephemeral='no' private='no'>
  <uuid>${UUID}</uuid>
  <usage type='ceph'>
    <name>client.cinder secret</name>
  </usage>
</secret>
EOF

sudo virsh secret-define --file /tmp/secret.xml

# Set secret value (Cinder key dari ceph auth)
CINDER_KEY=$(sudo ceph auth get-key client.cinder)
sudo virsh secret-set-value --secret ${UUID} --base64 ${CINDER_KEY}

# Restart Cinder
sudo systemctl restart cinder-volume

# Buat volume type
openstack volume type create ceph
openstack volume type set ceph --property volume_backend_name=ceph

# Buat volume — otomatis masuk ke Ceph
openstack volume create --size 10 --type ceph test-ceph-vol

# Verifikasi di Ceph
sudo rbd -p volumes ls
# volume-xxxxxxxx-xxxx-xxxx-xxxx-xxxxxxxxxxxx
Konfigurasi Nova dengan Ceph (Ephemeral Disk)
# /etc/nova/nova.conf (di setiap compute node)
[libvirt]
images_type = rbd
images_rbd_pool = vms
images_rbd_ceph_conf = /etc/ceph/ceph.conf
rbd_user = cinder
rbd_secret_uuid = 457eb676-33da-42ec-9a8c-9293d545c337
sudo systemctl restart nova-compute

# Boot VM — ephemeral disk otomatis CoW clone dari Glance image di Ceph
# Proses boot jauh lebih cepat karena tidak perlu download image via network
openstack server create \
  --flavor m1.small \
  --image "Ubuntu 22.04 Ceph" \
  --key-name my-key \
  --network internal-net \
  ceph-vm-01

# Live migration otomatis work tanpa konfigurasi tambahan
# karena disk sudah di shared Ceph storage
openstack server migrate --live compute2 ceph-vm-01
15. Security Hardening OpenStack
Checklist Security
| Area | Item | Prioritas |
|---|---|---|
| Keystone | Gunakan Fernet token, bukan UUID | Tinggi |
| Keystone | Set token expiration ke 1 jam atau kurang | Tinggi |
| Keystone | Aktifkan password policy | Tinggi |
| API | Semua endpoint pakai HTTPS | Tinggi |
| API | Rate limiting di HAProxy/Nginx | Menengah |
| RabbitMQ | Gunakan TLS untuk inter-node | Tinggi |
| Database | Encrypt at rest | Menengah |
| Database | Batasi akses network ke controller only | Tinggi |
| Nova | Aktifkan sVirt/SELinux di compute node | Menengah |
| Nova | Disable serial console jika tidak perlu | Rendah |
| Neutron | Default security group deny all inbound | Default |
| Neutron | Anti-spoofing port security enabled | Default |
| Horizon | Session timeout 30 menit | Menengah |
| Horizon | CSRF protection enabled | Default |
| Glance | Image signature verification | Menengah |
| Swift | Encrypt data at rest | Menengah |
| Semua service | Dedicated service accounts, minimal privilege | Tinggi |
HTTPS untuk Semua API Endpoint
# Generate self-signed certificate (production pakai CA asli)
sudo openssl req -x509 -nodes -days 365 \
  -newkey rsa:2048 \
  -keyout /etc/ssl/private/openstack.key \
  -out /etc/ssl/certs/openstack.crt \
  -subj "/CN=controller" \
  -addext "subjectAltName=DNS:controller,IP:10.0.0.11"

# Konfigurasi HAProxy untuk TLS termination
sudo tee /etc/haproxy/haproxy.cfg << 'EOF'
global
    log /dev/log local0
    chroot /var/lib/haproxy
    stats socket /run/haproxy/admin.sock mode 660 level admin
    ssl-default-bind-ciphers ECDHE+AESGCM:ECDHE+CHACHA20
    ssl-default-bind-options ssl-min-ver TLSv1.2

defaults
    mode http
    log global
    option httplog
    timeout connect 5s
    timeout client 30s
    timeout server 30s

frontend keystone_public
    bind *:5000 ssl crt /etc/ssl/private/openstack.pem
    default_backend keystone_api

backend keystone_api
    balance roundrobin
    server controller1 10.0.0.11:5000 check
    server controller2 10.0.0.12:5000 check backup

frontend nova_api
    bind *:8774 ssl crt /etc/ssl/private/openstack.pem
    default_backend nova_api_backend

backend nova_api_backend
    balance roundrobin
    server controller1 10.0.0.11:8774 check
    server controller2 10.0.0.12:8774 check backup

frontend neutron_api
    bind *:9696 ssl crt /etc/ssl/private/openstack.pem
    default_backend neutron_api_backend

backend neutron_api_backend
    balance roundrobin
    server controller1 10.0.0.11:9696 check
    server controller2 10.0.0.12:9696 check backup
EOF

# Gabungkan cert dan key untuk HAProxy
sudo cat /etc/ssl/certs/openstack.crt /etc/ssl/private/openstack.key \
  | sudo tee /etc/ssl/private/openstack.pem

sudo systemctl restart haproxy
Keystone Password Policy
# /etc/keystone/keystone.conf
[security_compliance]
# Minimum password length
password_regex = ^(?=.*\d)(?=.*[a-z])(?=.*[A-Z]).{8,}$
password_regex_description = Password must be at least 8 characters, with uppercase, lowercase, and number.

# Lockout after failed attempts
lockout_failure_attempts = 5
lockout_duration = 1800

# Password expiry
password_expires_days = 90
minimum_password_age = 1
unique_last_password_count = 5
sudo systemctl restart apache2

# Test password policy — password lemah akan ditolak
openstack user create --password "weak" testuser
# HTTP 400 Bad Request: Password does not match policy requirements.

# Password kuat
openstack user create --password "Str0ngP@ss2026" testuser
# User berhasil dibuat
Network Security — Security Group Best Practice
# Buat security group dengan prinsip least privilege
openstack security group create web-prod \
  --description "Production web server - minimal access"

# Hanya izinkan HTTP/HTTPS dari anywhere
openstack security group rule create web-prod \
  --protocol tcp --dst-port 80 --remote-ip 0.0.0.0/0

openstack security group rule create web-prod \
  --protocol tcp --dst-port 443 --remote-ip 0.0.0.0/0

# SSH hanya dari bastion/jump host
openstack security group rule create web-prod \
  --protocol tcp --dst-port 22 --remote-ip 10.0.0.5/32

# Izinkan ICMP hanya dari internal network
openstack security group rule create web-prod \
  --protocol icmp --remote-ip 10.10.0.0/24

# List rules — verifikasi tidak ada rule terlalu permissive
openstack security group rule list web-prod

# Output:
# +----------+-----------+-----------+------------------+-----------+-----------+
# | ID       | Direction | Ethertype | Port Range       | Protocol  | Remote IP |
# +----------+-----------+-----------+------------------+-----------+-----------+
# | ...      | ingress   | IPv4      | 80:80            | tcp       | 0.0.0.0/0 |
# | ...      | ingress   | IPv4      | 443:443          | tcp       | 0.0.0.0/0 |
# | ...      | ingress   | IPv4      | 22:22            | tcp       | 10.0.0.5  |
# | ...      | ingress   | IPv4      |                  | icmp      | 10.10.0.0 |
# | ...      | egress    | IPv4      |                  |           | 0.0.0.0/0 |
# | ...      | egress    | IPv6      |                  |           | ::/0      |
# +----------+-----------+-----------+------------------+-----------+-----------+
Audit Logging
# /etc/nova/nova.conf
[oslo_middleware]
enable_proxy_headers_parsing = True

[audit_middleware_notifications]
driver = log

# /etc/keystone/keystone.conf
[audit]
namespace = openstack
# Cek audit log
sudo grep "identity" /var/log/keystone/keystone-audit.log | tail -5
# 2026-03-10 10:15:00.123 INFO ... action=authenticate outcome=success ...
# 2026-03-10 10:15:05.456 INFO ... action=create/user outcome=success ...
# 2026-03-10 10:15:10.789 WARNING ... action=authenticate outcome=failure ...
16. Troubleshooting OpenStack — Kasus Nyata dan Solusi
Kasus 1: VM Stuck di BUILD Status
# Cek status VM
openstack server show stuck-vm | grep -E "status|task_state|power_state"
# | OS-EXT-STS:power_state | NOSTATE    |
# | OS-EXT-STS:task_state  | scheduling |
# | status                 | BUILD      |

# Kemungkinan penyebab:
# 1. Nova scheduler tidak bisa menemukan compute node yang cocok
# 2. Image terlalu besar, download timeout
# 3. Neutron gagal buat port

# Cek log Nova scheduler
sudo grep "stuck-vm" /var/log/nova/nova-scheduler.log | tail -20
# ERROR NoValidHost: No valid host was found. There are not enough hosts available.

# Cek apakah compute node punya cukup resource
openstack hypervisor stats show
# +----------------------+-------+
# | Field                | Value |
# +----------------------+-------+
# | count                | 2     |
# | current_workload     | 0     |
# | disk_available_least | 150   |
# | free_disk_gb         | 200   |
# | free_ram_mb          | 12288 |
# | local_gb             | 300   |
# | local_gb_used        | 100   |
# | memory_mb            | 32768 |
# | memory_mb_used       | 20480 |
# | running_vms          | 5     |
# | vcpus                | 16    |
# | vcpus_used           | 10    |
# +----------------------+-------+

# Kalau resource cukup tapi tetap NoValidHost, cek filter:
sudo grep "filter" /var/log/nova/nova-scheduler.log | tail
# Filter RamFilter returned 0 hosts
# → RAM tidak cukup setelah overcommit ratio dihitung

# Solusi: tambah compute node, atau naikkan overcommit ratio
# Di nova.conf controller:
# [DEFAULT]
# ram_allocation_ratio = 1.5    (default 1.5, naikkan kalau perlu)
# cpu_allocation_ratio = 16.0   (default 16.0)
# disk_allocation_ratio = 1.0   (default 1.0)

# Force delete VM yang stuck
openstack server delete --force stuck-vm
Kasus 2: Service Down / Not Responding
# Cek semua service OpenStack
openstack compute service list
openstack network agent list
openstack volume service list

# Contoh output — ada service yang down:
# +----+------------------+----------+------+---------+-------+
# | ID | Binary           | Host     | Zone | Status  | State |
# +----+------------------+----------+------+---------+-------+
# |  1 | nova-conductor   | ctrl     | int  | enabled | up    |
# |  2 | nova-scheduler   | ctrl     | int  | enabled | up    |
# |  3 | nova-compute     | comp1    | nova | enabled | up    |
# |  4 | nova-compute     | comp2    | nova | enabled | down  | ← problem
# +----+------------------+----------+------+---------+-------+

# Cek di comp2
ssh comp2 "sudo systemctl status nova-compute"
# ● nova-compute.service - OpenStack Compute
#    Loaded: loaded
#    Active: inactive (dead)         ← service mati

# Cek log kenapa mati
ssh comp2 "sudo journalctl -u nova-compute --since '1 hour ago' | tail -30"
# ERROR oslo_messaging ... [Errno 111] Connection refused
# → RabbitMQ tidak bisa diakses dari comp2

# Cek koneksi ke RabbitMQ
ssh comp2 "nc -zv controller 5672"
# Connection to controller 5672 port [tcp/amqp] succeeded!
# → network OK, tapi bisa juga credential problem

# Cek credential RabbitMQ
ssh comp2 "grep transport_url /etc/nova/nova.conf"
# transport_url = rabbit://openstack:Secret1234!@controller:5672/

# Test manual
ssh comp2 "python3 -c \"
import pika
conn = pika.BlockingConnection(pika.URLParameters('amqp://openstack:Secret1234!@controller:5672/'))
print('OK')
conn.close()
\""
# Kalau error: check password di RabbitMQ controller
# sudo rabbitmqctl list_users

# Restart service
ssh comp2 "sudo systemctl restart nova-compute"
ssh comp2 "sudo systemctl status nova-compute"
Kasus 3: Volume Attach Gagal
# Error saat attach volume:
# ERROR: Failed to attach volume xxxx to server yyyy

# Cek log Cinder
sudo grep "xxxx" /var/log/cinder/cinder-volume.log | tail -20

# Kemungkinan error:
# 1. "target not found" → iSCSI target belum dibuat
# 2. "Unauthorized" → Ceph keyring problem

# Untuk LVM backend:
sudo lvs
# Pastikan volume group ada dan ada cukup space
# LV             VG          Attr       LSize  Pool
# volume-xxxx    cinder-vols -wi-a----- 20.00g

# Cek iSCSI target
sudo tgtadm --mode target --op show | grep "Target"
# Target 1: iqn.2010-10.org.openstack:volume-xxxx

# Untuk Ceph backend:
sudo rbd -p volumes ls | grep xxxx
# volume-xxxx-xxxx-xxxx-xxxx-xxxxxxxxxxxx

# Cek di compute node apakah bisa connect ke Ceph
ssh compute1 "sudo rbd -p volumes --id cinder ls"
# Harus bisa list volumes

# Kalau error permission:
# rbd: error opening pool 'volumes': (1) Operation not permitted
# → Keyring salah atau tidak ada
ssh compute1 "ls -la /etc/ceph/ceph.client.cinder.keyring"
# Pastikan file ada dan isinya benar
Kasus 4: Horizon 500 Error
# Cek Apache error log
sudo tail -30 /var/log/apache2/error.log

# Common errors:
# 1. "Could not find a version that satisfies the requirement"
#    → pip dependency conflict, reinstall horizon
#
# 2. "OperationalError: (2003, 'Can't connect to MySQL server')"
#    → Database down
#    sudo systemctl status mariadb
#
# 3. "Unauthorized: The request you have made requires authentication"
#    → Keystone endpoint berubah tapi Horizon config belum update

# Cek /etc/openstack-dashboard/local_settings.py
grep OPENSTACK_KEYSTONE_URL /etc/openstack-dashboard/local_settings.py
# OPENSTACK_KEYSTONE_URL = "http://controller:5000/identity/v3"

# Cek koneksi ke Keystone
curl -s http://controller:5000/v3 | python3 -m json.tool
# Harus return JSON version info

# Clear session cache
sudo rm -rf /var/lib/openstack-dashboard/secret_key_store /tmp/django_cache*
sudo systemctl restart apache2
Kasus 5: RabbitMQ Cluster Split Brain
# Gejala: beberapa service error "connection refused" secara intermittent

# Cek status RabbitMQ cluster
sudo rabbitmqctl cluster_status

# Output bermasalah:
# Cluster status of node rabbit@controller ...
# [{nodes,[{disc,[rabbit@controller,rabbit@controller2]}]},
#  {running_nodes,[rabbit@controller]},        ← controller2 tidak running
#  {partitions,[{rabbit@controller,[rabbit@controller2]}]}]  ← PARTITIONED!

# Fix split brain:
# 1. Stop RabbitMQ di node yang partitioned
ssh controller2 "sudo systemctl stop rabbitmq-server"

# 2. Reset node
ssh controller2 "sudo rabbitmqctl reset"

# 3. Join kembali ke cluster
ssh controller2 "sudo rabbitmqctl join_cluster rabbit@controller"

# 4. Start
ssh controller2 "sudo systemctl start rabbitmq-server"

# 5. Verifikasi
sudo rabbitmqctl cluster_status
# partitions harus kosong: {partitions,[]}
Kasus 6: Disk Full di Controller
# Gejala: service mulai error secara acak

df -h
# Filesystem      Size  Used Avail Use% Mounted on
# /dev/vda1        50G   48G  1.5G  97% /           ← hampir penuh!

# Cari file besar
sudo du -sh /var/log/* | sort -rh | head -10
# 15G   /var/log/nova
# 8.5G  /var/log/neutron
# 5.2G  /var/log/cinder
# 3.1G  /var/log/keystone

# Truncate log yang terlalu besar (bukan delete — agar service tidak error)
sudo truncate -s 0 /var/log/nova/nova-api.log
sudo truncate -s 0 /var/log/nova/nova-scheduler.log
sudo truncate -s 0 /var/log/neutron/neutron-server.log

# Setup logrotate yang benar
sudo tee /etc/logrotate.d/openstack << 'EOF'
/var/log/nova/*.log
/var/log/neutron/*.log
/var/log/cinder/*.log
/var/log/keystone/*.log
/var/log/glance/*.log {
    daily
    missingok
    rotate 7
    compress
    delaycompress
    notifempty
    copytruncate
    maxsize 500M
}
EOF

# Test logrotate
sudo logrotate -d /etc/logrotate.d/openstack
# Harus tidak ada error

# Bersihkan juga: old kernels, apt cache
sudo apt-get autoremove -y
sudo apt-get clean
17. Performance Tuning OpenStack
Nova Performance
# /etc/nova/nova.conf — optimasi compute

[DEFAULT]
# CPU pinning — pin vCPU ke physical CPU core untuk workload latency-sensitive
# Aktifkan setelah test performance baseline
# vcpu_pin_set = 4-15          # core 0-3 untuk host OS, 4-15 untuk VM

# Overcommit ratio — sesuaikan dengan workload
cpu_allocation_ratio = 4.0     # prod: 2-4x, dev: 8-16x
ram_allocation_ratio = 1.0     # prod: 1.0 (no overcommit), dev: 1.5
disk_allocation_ratio = 1.0

[libvirt]
# Gunakan virtio untuk disk dan network — performa jauh lebih baik
disk_cachemodes = writeback     # atau none untuk Ceph
hw_disk_discard = unmap         # TRIM support untuk SSD backend

# Hugepages — kurangi TLB miss, terutama untuk VM besar (database, memory-intensive)
# Aktifkan hugepages di host dulu:
# echo 1024 > /proc/sys/vm/nr_hugepages (2MB pages)
# Lalu di nova.conf:
# [DEFAULT]
# reserved_huge_pages = node:0,size:2048,count:512
# Cek performa CPU VM vs bare metal
# Di dalam VM:
sudo apt-get install -y sysbench

# CPU benchmark
sysbench cpu --threads=2 --time=30 run

# Output (contoh):
#     events per second:  2145.67
#
# Latency (ms):
#          min:                                    0.87
#          avg:                                    0.93
#          max:                                    2.41
#          95th percentile:                        1.01

# Disk I/O benchmark
sysbench fileio --file-total-size=2G --file-test-mode=rndrw \
  --time=30 --max-requests=0 prepare

sysbench fileio --file-total-size=2G --file-test-mode=rndrw \
  --time=30 --max-requests=0 run

# Output:
# File operations:
#     reads/s:                      1523.45
#     writes/s:                     1015.63
#     fsyncs/s:                     3250.12
#
# Throughput:
#     read, MiB/s:                  23.80
#     written, MiB/s:              15.87

# Network benchmark (antar VM)
# Di VM receiver:
iperf3 -s

# Di VM sender:
iperf3 -c 10.10.0.8 -t 10

# Output:
# [ ID] Interval           Transfer     Bitrate
# [  5]   0.00-10.00  sec  2.73 GBytes  2.35 Gbits/sec
Neutron Performance
# /etc/neutron/plugins/ml2/openvswitch_agent.ini
[ovs]
# Aktifkan datapath_type=netdev untuk DPDK (kalau hardware support)
# datapath_type = netdev

[agent]
# Tuning polling interval
polling_interval = 2          # default 2, naikkan kalau terlalu banyak query

[securitygroup]
# Gunakan conntrack untuk Linux kernel >= 4.3
firewall_driver = openvswitch  # lebih cepat dari iptables
# Cek MTU — VXLAN overhead 50 bytes, jadi MTU internal harus dikurangi
# Physical NIC MTU: 1500 → VM MTU: 1450 (default)
# Kalau switch support jumbo frame: set MTU 9000 di physical
# → VM bisa pakai MTU 8950

# Di neutron.conf:
# [DEFAULT]
# global_physnet_mtu = 9000
# path_mtu = 8950

# Verifikasi MTU di VM
ssh ubuntu@203.0.113.10 "ip link show eth0 | grep mtu"
# mtu 1450 qdisc fq_codel state UP
Database Performance
# /etc/mysql/mariadb.conf.d/99-openstack.cnf
[mysqld]
max_connections = 4096
innodb_buffer_pool_size = 4G         # set ke 50-70% RAM yang tersedia
innodb_log_file_size = 256M
innodb_flush_method = O_DIRECT
innodb_flush_log_at_trx_commit = 2   # balance antara durability dan performa
innodb_io_capacity = 2000            # naikkan untuk SSD
query_cache_type = 0                 # disable query cache (deprecated, bikin lock)
# Monitor MySQL performance
sudo mysqladmin -u root -p status
# Uptime: 86400  Threads: 15  Questions: 1234567  Slow queries: 3
# Opens: 1500  Flush tables: 1  Open tables: 300  Queries per second avg: 14.289

# Cek slow queries
sudo mysql -u root -p -e "SHOW GLOBAL STATUS LIKE 'Slow_queries';"
# +---------------+-------+
# | Variable_name | Value |
# +---------------+-------+
# | Slow_queries  | 3     |
# +---------------+-------+

# Aktifkan slow query log
sudo mysql -u root -p -e "
SET GLOBAL slow_query_log = 'ON';
SET GLOBAL long_query_time = 1;
SET GLOBAL slow_query_log_file = '/var/log/mysql/slow.log';
"

# Cek slow queries
sudo tail -20 /var/log/mysql/slow.log
RabbitMQ Performance
# Cek queue yang backlog (message menumpuk)
sudo rabbitmqctl list_queues name messages consumers | sort -k2 -rn | head -10

# Output:
# conductor                    0    3
# scheduler.controller         0    1
# compute.compute1             0    1
# reply_xxxx_xxxx              0    1

# Kalau ada queue dengan messages > 0 yang terus naik → consumer stuck
# Restart service yang handle queue itu

# Monitor RabbitMQ via Management UI
# Aktifkan plugin
sudo rabbitmq-plugins enable rabbitmq_management

# Akses: http://controller:15672
# Login: guest/guest (ganti di production!)

# Set HA policy untuk semua queue OpenStack
sudo rabbitmqctl set_policy ha-all ".*" '{"ha-mode":"all"}' \
  --priority 0 --apply-to queues
Memcached Tuning
# Edit /etc/memcached.conf
# -m 512          # default 64MB, naikkan ke 512MB atau lebih
# -c 4096         # max connections, naikkan dari default 1024

sudo systemctl restart memcached

# Monitor hit rate
echo "stats" | nc controller 11211 | grep -E "get_hits|get_misses"
# STAT get_hits 1234567
# STAT get_misses 12345

# Hit rate = hits / (hits + misses) * 100
# Target: > 90%
# Contoh: 1234567 / (1234567 + 12345) * 100 = 99.0% ← bagus
18. Backup dan Disaster Recovery
Strategi Backup OpenStack
Ada dua level backup yang perlu dipikirkan:
- Control plane — database, konfigurasi service, Keystone data
- Data plane — VM disk, Cinder volume, Glance image, Swift object
Backup Control Plane
Database Backup (MariaDB)
# Full dump semua database OpenStack
mysqldump -u root -p --all-databases --single-transaction \
  --routines --triggers --events \
  | gzip > /backup/openstack-db-$(date +%Y%m%d-%H%M%S).sql.gz

# Output:
# (file size tergantung jumlah data)
# -rw-r--r-- 1 root root 45M Mar 10 10:00 openstack-db-20260310-100000.sql.gz

# Dump database spesifik
for db in keystone nova nova_api nova_cell0 glance cinder neutron heat; do
  mysqldump -u root -p --single-transaction "$db" \
    | gzip > "/backup/db-${db}-$(date +%Y%m%d).sql.gz"
  echo "Backed up: $db"
done

# Output:
# Backed up: keystone
# Backed up: nova
# Backed up: nova_api
# Backed up: nova_cell0
# Backed up: glance
# Backed up: cinder
# Backed up: neutron
# Backed up: heat

# Restore database dari backup
gunzip < /backup/db-keystone-20260310.sql.gz | mysql -u root -p keystone
Backup Konfigurasi
# Backup semua file konfigurasi OpenStack
tar czf /backup/openstack-config-$(date +%Y%m%d).tar.gz \
  /etc/keystone/ \
  /etc/nova/ \
  /etc/neutron/ \
  /etc/cinder/ \
  /etc/glance/ \
  /etc/heat/ \
  /etc/horizon/ \
  /etc/haproxy/ \
  /etc/rabbitmq/ \
  /etc/mysql/ \
  /etc/ceph/ \
  2>/dev/null

# Output:
# tar: Removing leading '/' from member names
# -rw-r--r-- 1 root root 2.3M Mar 10 10:05 openstack-config-20260310.tar.gz

# Backup Fernet keys (penting untuk Keystone)
sudo tar czf /backup/fernet-keys-$(date +%Y%m%d).tar.gz \
  /etc/keystone/fernet-keys/

# Backup credential keys
sudo tar czf /backup/credential-keys-$(date +%Y%m%d).tar.gz \
  /etc/keystone/credential-keys/
Automasi Backup dengan Cron
# File: /usr/local/bin/openstack-backup.sh
cat > /usr/local/bin/openstack-backup.sh << 'SCRIPT'
#!/bin/bash
set -e

BACKUP_DIR="/backup/openstack/$(date +%Y%m%d)"
RETENTION_DAYS=30

mkdir -p "$BACKUP_DIR"

echo "[$(date)] Starting OpenStack backup..."

# 1. Database
echo "[$(date)] Backing up databases..."
for db in keystone nova nova_api nova_cell0 glance cinder neutron heat; do
  mysqldump -u root --single-transaction "$db" \
    | gzip > "${BACKUP_DIR}/db-${db}.sql.gz"
done

# 2. Config files
echo "[$(date)] Backing up configuration..."
tar czf "${BACKUP_DIR}/config.tar.gz" \
  /etc/keystone/ /etc/nova/ /etc/neutron/ \
  /etc/cinder/ /etc/glance/ /etc/heat/ \
  /etc/haproxy/ /etc/rabbitmq/ /etc/mysql/ \
  2>/dev/null

# 3. Fernet keys
echo "[$(date)] Backing up Fernet keys..."
tar czf "${BACKUP_DIR}/fernet-keys.tar.gz" /etc/keystone/fernet-keys/
tar czf "${BACKUP_DIR}/credential-keys.tar.gz" /etc/keystone/credential-keys/

# 4. Cleanup old backups
echo "[$(date)] Cleaning backups older than ${RETENTION_DAYS} days..."
find /backup/openstack/ -maxdepth 1 -type d -mtime +${RETENTION_DAYS} -exec rm -rf {} \;

echo "[$(date)] Backup completed: ${BACKUP_DIR}"
du -sh "${BACKUP_DIR}"
SCRIPT

chmod +x /usr/local/bin/openstack-backup.sh

# Tambahkan ke crontab — jalankan setiap hari jam 2 pagi
echo "0 2 * * * /usr/local/bin/openstack-backup.sh >> /var/log/openstack-backup.log 2>&1" \
  | sudo crontab -

# Verifikasi crontab
sudo crontab -l
# 0 2 * * * /usr/local/bin/openstack-backup.sh >> /var/log/openstack-backup.log 2>&1
Backup Data Plane
Snapshot Semua VM dalam Project
# List semua VM
openstack server list --project dev-team

# Output:
# +--------------------------------------+----------+--------+----------------------+
# | ID                                   | Name     | Status | Networks             |
# +--------------------------------------+----------+--------+----------------------+
# | abc123... | web-01   | ACTIVE | internal-net=10.10.0.5 |
# | def456... | web-02   | ACTIVE | internal-net=10.10.0.6 |
# | ghi789... | db-01    | ACTIVE | internal-net=10.10.0.7 |
# +--------------------------------------+----------+--------+----------------------+

# Snapshot semua VM secara batch
for vm in $(openstack server list -f value -c Name); do
  echo "Snapshotting: $vm"
  openstack server image create "$vm" --name "snap-${vm}-$(date +%Y%m%d)"
done

# Output:
# Snapshotting: web-01
# Snapshotting: web-02
# Snapshotting: db-01

# List snapshot yang dibuat
openstack image list --property owner=$(openstack project show dev-team -f value -c id) \
  | grep snap

# +--------------------------------------+------------------------+--------+
# | ID                                   | Name                   | Status |
# +--------------------------------------+------------------------+--------+
# | ... | snap-web-01-20260310   | active |
# | ... | snap-web-02-20260310   | active |
# | ... | snap-db-01-20260310    | active |
# +--------------------------------------+------------------------+--------+
Backup Volume ke Swift (Offsite)
# Backup semua volume dalam project
for vol in $(openstack volume list -f value -c Name); do
  echo "Backing up volume: $vol"
  openstack volume backup create \
    --name "backup-${vol}-$(date +%Y%m%d)" \
    "$vol"
done

# Monitor progress
openstack volume backup list
# +----------+------------------------------+--------+------+
# | ID       | Name                         | Status | Size |
# +----------+------------------------------+--------+------+
# | ...      | backup-my-data-vol-20260310  | avail  |   20 |
# | ...      | backup-db-vol-20260310       | avail  |   50 |
# +----------+------------------------------+--------+------+
Disaster Recovery — Restore dari Backup
# Skenario: controller crash total, build controller baru

# 1. Install OS dan paket OpenStack di controller baru
# (ikuti langkah instalasi manual di Bagian 3)

# 2. Restore konfigurasi
sudo tar xzf /backup/openstack/20260310/config.tar.gz -C /

# 3. Restore Fernet keys (penting!)
sudo tar xzf /backup/openstack/20260310/fernet-keys.tar.gz -C /
sudo tar xzf /backup/openstack/20260310/credential-keys.tar.gz -C /
sudo chown -R keystone:keystone /etc/keystone/fernet-keys/
sudo chown -R keystone:keystone /etc/keystone/credential-keys/

# 4. Restore database
for db in keystone nova nova_api nova_cell0 glance cinder neutron heat; do
  mysql -u root -e "CREATE DATABASE IF NOT EXISTS $db;"
  gunzip < "/backup/openstack/20260310/db-${db}.sql.gz" | mysql -u root "$db"
  echo "Restored: $db"
done

# 5. Restart semua service
sudo systemctl restart apache2          # Keystone
sudo systemctl restart nova-api nova-scheduler nova-conductor
sudo systemctl restart neutron-server neutron-linuxbridge-agent
sudo systemctl restart cinder-api cinder-scheduler cinder-volume
sudo systemctl restart glance-api

# 6. Verifikasi
openstack token issue
openstack service list
openstack compute service list
openstack network agent list

# Compute node yang masih running akan reconnect otomatis ke controller baru
# VM yang sedang berjalan di compute node TIDAK terpengaruh
19. Monitoring OpenStack dengan Prometheus dan Grafana
Arsitektur Monitoring
                                  ┌──────────────┐
                                  │   Grafana     │
                                  │  Dashboard    │
                                  │  :3000        │
                                  └──────┬────────┘
                                         │ query
                                  ┌──────▼────────┐
                                  │  Prometheus   │
                                  │  TSDB         │
                                  │  :9090        │
                                  └──────┬────────┘
                                         │ scrape
              ┌──────────────────────────┼───────────────────────────┐
              │                          │                          │
     ┌────────▼────────┐       ┌─────────▼────────┐       ┌────────▼────────┐
     │ node_exporter   │       │ node_exporter    │       │ openstack       │
     │ controller:9100 │       │ compute1:9100    │       │ _exporter       │
     └─────────────────┘       └──────────────────┘       │ controller:9198 │
                                                          └─────────────────┘
Install Prometheus Stack
# ======= Di monitoring server =======

# Install Prometheus
wget https://github.com/prometheus/prometheus/releases/download/v2.50.0/prometheus-2.50.0.linux-amd64.tar.gz
tar xzf prometheus-2.50.0.linux-amd64.tar.gz
sudo mv prometheus-2.50.0.linux-amd64 /opt/prometheus

# Konfigurasi Prometheus
sudo tee /opt/prometheus/prometheus.yml << 'EOF'
global:
  scrape_interval: 15s
  evaluation_interval: 15s

scrape_configs:
  - job_name: 'node_exporter'
    static_configs:
      - targets:
        - 'controller:9100'
        - 'compute1:9100'
        - 'compute2:9100'
        - 'ceph1:9100'

  - job_name: 'openstack_exporter'
    scrape_interval: 60s
    static_configs:
      - targets: ['controller:9198']

  - job_name: 'rabbitmq'
    static_configs:
      - targets: ['controller:15692']

  - job_name: 'mysql'
    static_configs:
      - targets: ['controller:9104']

  - job_name: 'haproxy'
    static_configs:
      - targets: ['controller:8405']
EOF

# Buat systemd service
sudo tee /etc/systemd/system/prometheus.service << 'EOF'
[Unit]
Description=Prometheus
After=network.target

[Service]
Type=simple
User=prometheus
ExecStart=/opt/prometheus/prometheus \
  --config.file=/opt/prometheus/prometheus.yml \
  --storage.tsdb.path=/opt/prometheus/data \
  --storage.tsdb.retention.time=90d
Restart=always

[Install]
WantedBy=multi-user.target
EOF

sudo useradd -r -s /usr/sbin/nologin prometheus
sudo chown -R prometheus:prometheus /opt/prometheus
sudo systemctl daemon-reload
sudo systemctl enable --now prometheus

# Cek status
curl -s http://localhost:9090/api/v1/targets | python3 -m json.tool | head -20
Install Node Exporter (di Semua Node)
# Download dan install
wget https://github.com/prometheus/node_exporter/releases/download/v1.7.0/node_exporter-1.7.0.linux-amd64.tar.gz
tar xzf node_exporter-1.7.0.linux-amd64.tar.gz
sudo mv node_exporter-1.7.0.linux-amd64/node_exporter /usr/local/bin/

# Buat systemd service
sudo tee /etc/systemd/system/node_exporter.service << 'EOF'
[Unit]
Description=Node Exporter
After=network.target

[Service]
Type=simple
User=nobody
ExecStart=/usr/local/bin/node_exporter \
  --collector.systemd \
  --collector.processes
Restart=always

[Install]
WantedBy=multi-user.target
EOF

sudo systemctl daemon-reload
sudo systemctl enable --now node_exporter

# Verifikasi metrics
curl -s http://localhost:9100/metrics | head -5
# # HELP node_cpu_seconds_total Seconds the CPUs spent in each mode.
# # TYPE node_cpu_seconds_total counter
# node_cpu_seconds_total{cpu="0",mode="idle"} 123456.78
# node_cpu_seconds_total{cpu="0",mode="system"} 2345.67
# node_cpu_seconds_total{cpu="0",mode="user"} 5678.90
OpenStack Exporter
# Install openstack-exporter
pip install prometheus-openstack-exporter

# Atau pakai binary
wget https://github.com/openstack-exporter/openstack-exporter/releases/download/v0.7.0/openstack-exporter-linux-amd64
chmod +x openstack-exporter-linux-amd64
sudo mv openstack-exporter-linux-amd64 /usr/local/bin/openstack-exporter

# Buat config
sudo tee /etc/openstack-exporter/clouds.yaml << 'EOF'
clouds:
  openstack:
    auth:
      auth_url: http://controller:5000/v3
      username: admin
      password: Secret1234!
      project_name: admin
      user_domain_name: Default
      project_domain_name: Default
    region_name: RegionOne
    interface: internal
EOF

# Jalankan
sudo tee /etc/systemd/system/openstack-exporter.service << 'EOF'
[Unit]
Description=OpenStack Exporter
After=network.target

[Service]
Type=simple
Environment="OS_CLIENT_CONFIG_FILE=/etc/openstack-exporter/clouds.yaml"
ExecStart=/usr/local/bin/openstack-exporter --cloud openstack
Restart=always

[Install]
WantedBy=multi-user.target
EOF

sudo systemctl daemon-reload
sudo systemctl enable --now openstack-exporter

# Cek metrics yang di-export
curl -s http://localhost:9198/metrics | grep openstack | head -20
# openstack_nova_total_vms 12
# openstack_nova_running_vms 8
# openstack_nova_vcpus_available 64
# openstack_nova_vcpus_used 24
# openstack_nova_ram_available_bytes 1.37438953472e+11
# openstack_nova_ram_used_bytes 5.36870912e+10
# openstack_neutron_floating_ips 15
# openstack_neutron_floating_ips_associated 8
# openstack_cinder_volumes 20
# openstack_cinder_volume_size_gb 500
# openstack_glance_images 5
Install dan Konfigurasi Grafana
# Install Grafana
sudo apt-get install -y apt-transport-https software-properties-common
wget -q -O - https://apt.grafana.com/gpg.key | sudo apt-key add -
echo "deb https://apt.grafana.com stable main" | sudo tee /etc/apt/sources.list.d/grafana.list
sudo apt-get update
sudo apt-get install -y grafana

sudo systemctl enable --now grafana-server

# Akses: http://monitoring-server:3000
# Default login: admin/admin
Setelah login ke Grafana:
-
Tambahkan data source Prometheus: Settings → Data Sources → Add → Prometheus → URL:
http://localhost:9090 -
Import dashboard yang sudah jadi:
- Dashboard ID 1860 — Node Exporter Full
- Dashboard ID 10171 — RabbitMQ Overview
- Dashboard ID 7362 — MySQL Overview
-
Buat custom dashboard untuk OpenStack:
Panel 1: Total Running VMs
  Query: openstack_nova_running_vms

Panel 2: vCPU Usage Percentage
  Query: (openstack_nova_vcpus_used / openstack_nova_vcpus_available) * 100

Panel 3: RAM Usage Percentage
  Query: (openstack_nova_ram_used_bytes / openstack_nova_ram_available_bytes) * 100

Panel 4: Floating IPs Available
  Query: openstack_neutron_floating_ips - openstack_neutron_floating_ips_associated

Panel 5: Volume Total Size (GB)
  Query: openstack_cinder_volume_size_gb
Alert dengan Alertmanager
# /opt/prometheus/alert_rules.yml
groups:
  - name: openstack_alerts
    rules:
      - alert: HighCPUUsage
        expr: (1 - avg(rate(node_cpu_seconds_total{mode="idle"}[5m])) by (instance)) * 100 > 90
        for: 5m
        labels:
          severity: warning
        annotations:
          summary: "High CPU on {{ $labels.instance }}"
          description: "CPU usage above 90% for 5 minutes. Current: {{ $value }}%"

      - alert: HighMemoryUsage
        expr: (1 - node_memory_MemAvailable_bytes / node_memory_MemTotal_bytes) * 100 > 90
        for: 5m
        labels:
          severity: warning
        annotations:
          summary: "High memory on {{ $labels.instance }}"

      - alert: DiskSpaceLow
        expr: (1 - node_filesystem_avail_bytes{mountpoint="/"} / node_filesystem_size_bytes{mountpoint="/"}) * 100 > 85
        for: 10m
        labels:
          severity: critical
        annotations:
          summary: "Disk space low on {{ $labels.instance }}"
          description: "Root filesystem usage above 85%. Current: {{ $value }}%"

      - alert: OpenStackServiceDown
        expr: openstack_nova_agent_state == 0
        for: 2m
        labels:
          severity: critical
        annotations:
          summary: "OpenStack service down"

      - alert: RabbitMQQueueBacklog
        expr: rabbitmq_queue_messages > 1000
        for: 5m
        labels:
          severity: warning
        annotations:
          summary: "RabbitMQ queue backlog on {{ $labels.queue }}"
# Tambahkan rule file ke prometheus.yml
# rule_files:
#   - "alert_rules.yml"

# Restart Prometheus
sudo systemctl restart prometheus

# Cek alert rules loaded
curl -s http://localhost:9090/api/v1/rules | python3 -m json.tool | grep alertname
20. OpenStack dengan Terraform
Terraform bisa dipakai untuk manage resource OpenStack layaknya manage AWS. Ini memudahkan infrastructure as code workflow yang sudah familiar bagi tim DevOps.
Install dan Setup
# Install Terraform
wget https://releases.hashicorp.com/terraform/1.7.0/terraform_1.7.0_linux_amd64.zip
unzip terraform_1.7.0_linux_amd64.zip
sudo mv terraform /usr/local/bin/

terraform version
# Terraform v1.7.0

# Buat project directory
mkdir -p ~/terraform-openstack && cd ~/terraform-openstack
Provider Configuration
# providers.tf
terraform {
  required_version = ">= 1.5.0"
  required_providers {
    openstack = {
      source  = "terraform-provider-openstack/openstack"
      version = "~> 1.54"
    }
  }
}

provider "openstack" {
  auth_url    = "http://controller:5000/v3"
  user_name   = "admin"
  password    = "Secret1234!"
  tenant_name = "admin"
  domain_name = "Default"
  region      = "RegionOne"
}
Deploy Full Stack dengan Terraform
# main.tf

# Network
resource "openstack_networking_network_v2" "app_net" {
  name           = "app-network"
  admin_state_up = true
}

resource "openstack_networking_subnet_v2" "app_subnet" {
  name       = "app-subnet"
  network_id = openstack_networking_network_v2.app_net.id
  cidr       = "192.168.200.0/24"
  ip_version = 4

  dns_nameservers = ["8.8.8.8", "8.8.4.4"]
}

resource "openstack_networking_router_v2" "app_router" {
  name                = "app-router"
  external_network_id = data.openstack_networking_network_v2.external.id
}

resource "openstack_networking_router_interface_v2" "app_router_iface" {
  router_id = openstack_networking_router_v2.app_router.id
  subnet_id = openstack_networking_subnet_v2.app_subnet.id
}

data "openstack_networking_network_v2" "external" {
  name = "public"
}

# Security Group
resource "openstack_networking_secgroup_v2" "web_sg" {
  name        = "web-sg"
  description = "Web server security group"
}

resource "openstack_networking_secgroup_rule_v2" "ssh" {
  direction         = "ingress"
  ethertype         = "IPv4"
  protocol          = "tcp"
  port_range_min    = 22
  port_range_max    = 22
  remote_ip_prefix  = "0.0.0.0/0"
  security_group_id = openstack_networking_secgroup_v2.web_sg.id
}

resource "openstack_networking_secgroup_rule_v2" "http" {
  direction         = "ingress"
  ethertype         = "IPv4"
  protocol          = "tcp"
  port_range_min    = 80
  port_range_max    = 80
  remote_ip_prefix  = "0.0.0.0/0"
  security_group_id = openstack_networking_secgroup_v2.web_sg.id
}

resource "openstack_networking_secgroup_rule_v2" "https" {
  direction         = "ingress"
  ethertype         = "IPv4"
  protocol          = "tcp"
  port_range_min    = 443
  port_range_max    = 443
  remote_ip_prefix  = "0.0.0.0/0"
  security_group_id = openstack_networking_secgroup_v2.web_sg.id
}

# Keypair
resource "openstack_compute_keypair_v2" "deploy_key" {
  name       = "deploy-key"
  public_key = file("~/.ssh/id_ed25519.pub")
}

# Data source: ambil image Ubuntu
data "openstack_images_image_v2" "ubuntu" {
  name        = "Ubuntu 22.04 LTS"
  most_recent = true
}

# Web Server Instances (2 buah)
resource "openstack_compute_instance_v2" "web" {
  count           = 2
  name            = "web-server-\${count.index + 1}"
  flavor_name     = "m1.small"
  image_id        = data.openstack_images_image_v2.ubuntu.id
  key_pair        = openstack_compute_keypair_v2.deploy_key.name
  security_groups = [openstack_networking_secgroup_v2.web_sg.name]

  network {
    uuid = openstack_networking_network_v2.app_net.id
  }

  user_data = <<-EOF
    #!/bin/bash
    apt-get update -y
    apt-get install -y nginx
    echo "<h1>Web Server \${count.index + 1}</h1>" > /var/www/html/index.html
    systemctl enable --now nginx
  EOF
}

# Floating IP untuk setiap web server
resource "openstack_networking_floatingip_v2" "web_fip" {
  count = 2
  pool  = "public"
}

resource "openstack_compute_floatingip_associate_v2" "web_fip_assoc" {
  count       = 2
  floating_ip = openstack_networking_floatingip_v2.web_fip[count.index].address
  instance_id = openstack_compute_instance_v2.web[count.index].id
}

# Cinder Volume untuk database
resource "openstack_blockstorage_volume_v3" "db_vol" {
  name        = "db-data-volume"
  size        = 50
  description = "Database data volume"
}

# Database Server
resource "openstack_compute_instance_v2" "db" {
  name            = "db-server"
  flavor_name     = "m1.medium"
  image_id        = data.openstack_images_image_v2.ubuntu.id
  key_pair        = openstack_compute_keypair_v2.deploy_key.name
  security_groups = [openstack_networking_secgroup_v2.web_sg.name]

  network {
    uuid = openstack_networking_network_v2.app_net.id
  }
}

resource "openstack_compute_volume_attach_v2" "db_vol_attach" {
  instance_id = openstack_compute_instance_v2.db.id
  volume_id   = openstack_blockstorage_volume_v3.db_vol.id
  device      = "/dev/vdb"
}
# outputs.tf
output "web_server_ips" {
  value = openstack_networking_floatingip_v2.web_fip[*].address
}

output "db_server_internal_ip" {
  value = openstack_compute_instance_v2.db.network[0].fixed_ip_v4
}

output "app_network_id" {
  value = openstack_networking_network_v2.app_net.id
}
# Init providers
terraform init

# Output:
# Initializing the backend...
# Initializing provider plugins...
# - Installing terraform-provider-openstack/openstack v1.54.1...
# - Installed terraform-provider-openstack/openstack v1.54.1
# Terraform has been successfully initialized!

# Plan — lihat apa yang akan dibuat
terraform plan

# Output:
# Plan: 14 to add, 0 to change, 0 to destroy.
#
# Changes to Outputs:
#   + web_server_ips     = [known after apply, known after apply]
#   + db_server_internal_ip = (known after apply)

# Apply — deploy semua resource
terraform apply -auto-approve

# Output:
# openstack_networking_network_v2.app_net: Creating...
# openstack_networking_network_v2.app_net: Creation complete [id=xxx] [3s]
# openstack_networking_subnet_v2.app_subnet: Creating...
# openstack_networking_subnet_v2.app_subnet: Creation complete [id=xxx] [3s]
# openstack_networking_router_v2.app_router: Creating...
# openstack_networking_router_v2.app_router: Creation complete [id=xxx] [5s]
# openstack_compute_instance_v2.web[0]: Creating...
# openstack_compute_instance_v2.web[1]: Creating...
# openstack_compute_instance_v2.db: Creating...
# openstack_compute_instance_v2.web[0]: Creation complete [id=xxx] [30s]
# openstack_compute_instance_v2.web[1]: Creation complete [id=xxx] [32s]
# openstack_compute_instance_v2.db: Creation complete [id=xxx] [28s]
# ...
# Apply complete! Resources: 14 added, 0 changed, 0 destroyed.
#
# Outputs:
#
# web_server_ips = [
#   "203.0.113.30",
#   "203.0.113.31",
# ]
# db_server_internal_ip = "192.168.200.10"

# Scale web server dari 2 ke 4 — ubah count = 4 lalu:
terraform apply -auto-approve
# Plan: 4 to add, 0 to change, 0 to destroy.
# 2 VM baru + 2 floating IP baru

# Hapus semua resource
terraform destroy -auto-approve
# Destroy complete! Resources: 14 destroyed.
21. Multi-Region dan Federation
Konsep Multi-Region
Multi-region artinya satu OpenStack cloud punya beberapa datacenter/lokasi, masing-masing dengan compute, storage, dan network sendiri, tapi share satu identity service (Keystone).
                 ┌─────────────────────────┐
                 │   Shared Keystone       │
                 │   (Identity Service)     │
                 └─────────┬───────────────┘
                           │
             ┌─────────────┼─────────────┐
             │                           │
     ┌───────▼────────┐         ┌────────▼───────┐
     │   RegionOne     │         │   RegionTwo     │
     │   Jakarta DC    │         │   Singapore DC  │
     │                 │         │                 │
     │ Nova, Neutron,  │         │ Nova, Neutron,  │
     │ Cinder, Glance  │         │ Cinder, Glance  │
     └────────────────┘         └─────────────────┘
Konfigurasi Multi-Region
# Register service endpoint di region berbeda
# RegionOne sudah ada (default), tambahkan RegionTwo

# Nova RegionTwo
openstack endpoint create --region RegionTwo \
  compute public http://controller-sg:8774/v2.1
openstack endpoint create --region RegionTwo \
  compute internal http://controller-sg:8774/v2.1
openstack endpoint create --region RegionTwo \
  compute admin http://controller-sg:8774/v2.1

# Glance RegionTwo
openstack endpoint create --region RegionTwo \
  image public http://controller-sg:9292
openstack endpoint create --region RegionTwo \
  image internal http://controller-sg:9292
openstack endpoint create --region RegionTwo \
  image admin http://controller-sg:9292

# Neutron RegionTwo
openstack endpoint create --region RegionTwo \
  network public http://controller-sg:9696
openstack endpoint create --region RegionTwo \
  network internal http://controller-sg:9696
openstack endpoint create --region RegionTwo \
  network admin http://controller-sg:9696

# Cinder RegionTwo
openstack endpoint create --region RegionTwo \
  volumev3 public http://controller-sg:8776/v3
openstack endpoint create --region RegionTwo \
  volumev3 internal http://controller-sg:8776/v3
openstack endpoint create --region RegionTwo \
  volumev3 admin http://controller-sg:8776/v3

# List semua endpoint
openstack endpoint list --region RegionTwo

# Output:
# +------+-----------+-----------+-----------+---------+-----------+-------------------+
# | ID   | Region    | Service   | Service   | Enable  | Interface | URL               |
# |      |           | Name      | Type      |         |           |                   |
# +------+-----------+-----------+-----------+---------+-----------+-------------------+
# | ...  | RegionTwo | nova      | compute   | True    | public    | http://ctrl-sg:.. |
# | ...  | RegionTwo | glance    | image     | True    | public    | http://ctrl-sg:.. |
# | ...  | RegionTwo | neutron   | network   | True    | public    | http://ctrl-sg:.. |
# | ...  | RegionTwo | cinderv3  | volumev3  | True    | public    | http://ctrl-sg:.. |
# +------+-----------+-----------+-----------+---------+-----------+-------------------+
# Operasi di region tertentu
openstack server list --os-region-name RegionOne
openstack server list --os-region-name RegionTwo

# Buat VM di RegionTwo (Singapore)
openstack server create \
  --os-region-name RegionTwo \
  --flavor m1.small \
  --image "Ubuntu 22.04 LTS" \
  --network internal-net \
  sg-web-01

# User pakai credential yang sama, hanya beda region
Keystone Federation (Lintas Organization)
Federation memungkinkan user dari organization A login ke cloud organization B tanpa perlu akun lokal.
Organization A (IdP)        Organization B (SP)
┌─────────────────┐         ┌─────────────────┐
│ Keystone A      │ SAML/   │ Keystone B      │
│ (Identity       │ OIDC    │ (Service        │
│  Provider)      │ ──────► │  Provider)      │
└─────────────────┘         └─────────────────┘
# keystone.conf di Service Provider (Org B)
[federation]
trusted_dashboard = http://horizon-b.example.com/auth/websso/

[auth]
methods = password,token,mapped

# Konfigurasi identity provider
# keystone federation protocol create saml2 \
#   --identity-provider orgA \
#   --mapping orgA-mapping
22. Operasi Sehari-Hari
Kumpulan command yang sering dipakai saat operasional OpenStack.
Monitoring Kesehatan Cluster
# Script cek health semua service
cat > /usr/local/bin/os-health.sh << 'SCRIPT'
#!/bin/bash
echo "=== OpenStack Health Check ==="
echo ""
echo "--- Compute Services ---"
openstack compute service list -f table

echo ""
echo "--- Network Agents ---"
openstack network agent list -f table

echo ""
echo "--- Volume Services ---"
openstack volume service list -f table

echo ""
echo "--- Hypervisor Stats ---"
openstack hypervisor stats show -f table

echo ""
echo "--- Disk Usage (Controller) ---"
df -h / /var/lib/nova /var/lib/glance 2>/dev/null

echo ""
echo "--- Memory Usage ---"
free -h

echo ""
echo "--- RabbitMQ Status ---"
sudo rabbitmqctl cluster_status 2>/dev/null | grep running_nodes
SCRIPT

chmod +x /usr/local/bin/os-health.sh

# Jalankan
/usr/local/bin/os-health.sh
Quota Management
# Lihat quota project
openstack quota show dev-team

# Output:
# +----------------------+-------+
# | Resource             | Limit |
# +----------------------+-------+
# | cores                |    20 |
# | instances            |    10 |
# | ram                  | 51200 |
# | floating-ips         |     5 |
# | networks             |    10 |
# | routers              |     5 |
# | subnets              |    10 |
# | ports                |    50 |
# | security-groups      |    10 |
# | security-group-rules |    20 |
# | volumes              |    10 |
# | gigabytes            |  1000 |
# | snapshots            |    10 |
# +----------------------+-------+

# Update quota
openstack quota set \
  --instances 20 \
  --cores 40 \
  --ram 102400 \
  --volumes 50 \
  --gigabytes 5000 \
  --floating-ips 20 \
  dev-team

# Cek usage vs quota
openstack limits show --absolute --project dev-team | grep -E "Used|Limit"
# | maxTotalCores        | 40     |
# | totalCoresUsed       | 12     |
# | maxTotalInstances    | 20     |
# | totalInstancesUsed   | 6      |
# | maxTotalRAMSize      | 102400 |
# | totalRAMUsed         | 24576  |
Manage User dan Role
# List semua user
openstack user list

# Disable user (tanpa hapus)
openstack user set --disable ali-dev

# Enable kembali
openstack user set --enable ali-dev

# Ganti password user
openstack user set --password "NewP@ss2026!" ali-dev

# Hapus user permanent
openstack user delete ali-dev

# List semua role
openstack role list
# +----------------------------------+--------+
# | ID                               | Name   |
# +----------------------------------+--------+
# | ...                              | admin  |
# | ...                              | member |
# | ...                              | reader |
# +----------------------------------+--------+

# Buat custom role
openstack role create project-admin

# Assign custom role
openstack role add --project dev-team --user senior-dev project-admin
VM Lifecycle Management
# Stop VM (graceful shutdown)
openstack server stop my-vm-01

# Start VM
openstack server start my-vm-01

# Reboot VM
openstack server reboot my-vm-01              # soft reboot
openstack server reboot --hard my-vm-01       # hard reboot (force)

# Pause (freeze state in memory)
openstack server pause my-vm-01
openstack server unpause my-vm-01

# Suspend (save state to disk, free RAM)
openstack server suspend my-vm-01
openstack server resume my-vm-01

# Rescue mode (boot dari rescue image untuk repair)
openstack server rescue my-vm-01
# Login via console, fix /dev/vda1
openstack server unrescue my-vm-01

# Rebuild VM dari image berbeda (data di root disk hilang)
openstack server rebuild --image "Ubuntu 22.04 LTS" my-vm-01

# Get console URL (VNC)
openstack console url show my-vm-01
# +----------+----------------------------------------------------------------+
# | Field    | Value                                                          |
# +----------+----------------------------------------------------------------+
# | protocol | vnc                                                            |
# | type     | novnc                                                          |
# | url      | http://controller:6080/vnc_auto.html?token=abc123xyz456...     |
# +----------+----------------------------------------------------------------+

# Console log (serial output — berguna debug boot problem)
openstack console log show my-vm-01
# [    0.000000] Linux version 5.15.0-101-generic ...
# [    0.012345] Command line: root=/dev/vda1 ...
# ...
# Ubuntu 22.04.4 LTS my-vm-01 ttyS0
# my-vm-01 login:
23. MicroStack — OpenStack di Laptop
MicroStack adalah distribusi OpenStack dari Canonical yang bisa diinstall via Snap. Cocok untuk percobaan di laptop tanpa perlu banyak konfigurasi.
Install MicroStack
# Install via Snap
sudo snap install microstack --beta

# Inisialisasi (all-in-one mode)
sudo microstack init --auto --control

# Output:
# 2026-03-10 10:00:00 INFO microstack_init.py Setting up ipv4 forwarding...
# 2026-03-10 10:00:01 INFO microstack_init.py Configuring clustering ...
# 2026-03-10 10:00:05 INFO microstack_init.py Setting up control plane ...
# 2026-03-10 10:00:15 INFO microstack_init.py Configuring nova compute ...
# 2026-03-10 10:00:30 INFO microstack_init.py Configuring OVN networking ...
# 2026-03-10 10:01:00 INFO microstack_init.py Setting up virtual networking ...
# 2026-03-10 10:01:30 INFO microstack_init.py Creating demo project ...
# 2026-03-10 10:01:45 INFO microstack_init.py Creating demo user ...
# 2026-03-10 10:02:00 INFO microstack_init.py MicroStack initialization complete!

# Horizon dashboard tersedia di:
# https://10.20.20.1

# Credential admin:
# Username: admin
# Password: (jalankan command di bawah)
sudo snap get microstack config.credentials.keystone-password
# xyzABC123...

# CLI pakai wrapper microstack
microstack launch cirros --name test-vm

# Output:
# Creating keypair (microstack) ...
# Launching instance ...
# Allocating floating IP ...
# Instance test-vm has been launched.
# Access it with:
#   ssh cirros@10.20.20.200 -i /home/ubuntu/snap/microstack/common/.ssh/id_microstack

# Langsung SSH ke VM
ssh cirros@10.20.20.200 -i /home/ubuntu/snap/microstack/common/.ssh/id_microstack
# $ hostname
# test-vm

# CLI OpenStack biasa juga bisa dipakai
microstack.openstack server list
# +--------------------------------------+---------+--------+-------------------------+
# | ID                                   | Name    | Status | Networks                |
# +--------------------------------------+---------+--------+-------------------------+
# | ...                                  | test-vm | ACTIVE | test=10.20.20.200       |
# +--------------------------------------+---------+--------+-------------------------+

# Cleanup
microstack.openstack server delete test-vm
MicroStack vs DevStack
| Aspek | MicroStack | DevStack |
|---|---|---|
| Install | snap install (5 menit) |
stack.sh (30+ menit) |
| Kompleksitas | Sangat rendah | Rendah |
| Customisasi | Terbatas | Penuh |
| Survive reboot | Ya | Tidak (perlu re-stack) |
| Networking | OVN (otomatis) | Configurable |
| Cocok untuk | Demo, quick test | Development, plugin test |
24. OpenStack SDK — Automasi dengan Python
Selain CLI, OpenStack bisa diakses lewat Python SDK. Ini berguna untuk automasi lebih kompleks yang sulit dilakukan lewat shell script.
Install SDK
pip install openstacksdk
Koneksi dan Operasi Dasar
# openstack_demo.py
import openstack

# Koneksi ke OpenStack
conn = openstack.connect(
    auth_url='http://controller:5000/v3',
    project_name='admin',
    username='admin',
    password='Secret1234!',
    user_domain_name='Default',
    project_domain_name='Default',
    region_name='RegionOne',
)

# List semua server
print("=== Servers ===")
for server in conn.compute.servers():
    print(f"  {server.name}: {server.status} | "
          f"flavor={server.flavor['original_name']} | "
          f"addresses={server.addresses}")

# Output:
# === Servers ===
#   web-01: ACTIVE | flavor=m1.small | addresses={'internal-net': [{'addr': '10.10.0.5'}]}
#   web-02: ACTIVE | flavor=m1.small | addresses={'internal-net': [{'addr': '10.10.0.6'}]}
#   db-01: ACTIVE | flavor=m1.medium | addresses={'internal-net': [{'addr': '10.10.0.7'}]}

# List images
print("\n=== Images ===")
for image in conn.image.images():
    size_mb = (image.size or 0) / 1024 / 1024
    print(f"  {image.name}: {image.status} | {size_mb:.0f} MB")

# Output:
# === Images ===
#   Ubuntu 22.04 LTS: active | 645 MB
#   CirrOS 0.6.1: active | 13 MB

# List volumes
print("\n=== Volumes ===")
for volume in conn.block_storage.volumes():
    print(f"  {volume.name}: {volume.status} | {volume.size} GB")

# Output:
# === Volumes ===
#   my-data-vol: in-use | 20 GB
#   db-vol: in-use | 50 GB
Automasi: Buat Multi-VM Environment
# deploy_environment.py
import openstack
import time
import sys

conn = openstack.connect(cloud='openstack')

def deploy_web_cluster(count=3, flavor='m1.small', image_name='Ubuntu 22.04 LTS'):
    """Deploy cluster web server dengan load balancer-ready setup."""

    image = conn.image.find_image(image_name)
    if not image:
        print(f"ERROR: Image '{image_name}' not found")
        sys.exit(1)

    flavor_obj = conn.compute.find_flavor(flavor)
    if not flavor_obj:
        print(f"ERROR: Flavor '{flavor}' not found")
        sys.exit(1)

    # Buat network
    print("Creating network...")
    network = conn.network.create_network(name="web-cluster-net")
    subnet = conn.network.create_subnet(
        name="web-cluster-subnet",
        network_id=network.id,
        cidr="10.100.0.0/24",
        ip_version=4,
        dns_nameservers=["8.8.8.8"],
    )

    # Buat router
    print("Creating router...")
    external_net = conn.network.find_network("public")
    router = conn.network.create_router(
        name="web-cluster-router",
        external_gateway_info={"network_id": external_net.id},
    )
    conn.network.add_interface_to_router(router, subnet_id=subnet.id)

    # Buat security group
    print("Creating security group...")
    sg = conn.network.create_security_group(
        name="web-cluster-sg",
        description="Web cluster security group"
    )

    for port in [22, 80, 443]:
        conn.network.create_security_group_rule(
            security_group_id=sg.id,
            direction="ingress",
            protocol="tcp",
            port_range_min=port,
            port_range_max=port,
            remote_ip_prefix="0.0.0.0/0",
        )

    conn.network.create_security_group_rule(
        security_group_id=sg.id,
        direction="ingress",
        protocol="icmp",
        remote_ip_prefix="0.0.0.0/0",
    )

    # Deploy VMs
    servers = []
    for i in range(count):
        name = f"web-{i+1:02d}"
        print(f"Creating server: {name}")

        user_data = f"""#!/bin/bash
apt-get update -y
apt-get install -y nginx
echo '<h1>Server {name}</h1><p>Deployed via OpenStack SDK</p>' > /var/www/html/index.html
systemctl enable --now nginx
"""

        server = conn.compute.create_server(
            name=name,
            image_id=image.id,
            flavor_id=flavor_obj.id,
            networks=[{"uuid": network.id}],
            security_groups=[{"name": sg.name}],
            user_data=user_data,
            key_name="my-key",
        )
        servers.append(server)

    # Wait for all to be ACTIVE
    print("\nWaiting for servers to become active...")
    for server in servers:
        conn.compute.wait_for_server(server, status='ACTIVE', wait=300)
        server = conn.compute.get_server(server.id)
        print(f"  {server.name}: ACTIVE")

    # Assign floating IPs
    print("\nAssigning floating IPs...")
    for server in servers:
        fip = conn.network.create_ip(floating_network_id=external_net.id)
        server = conn.compute.get_server(server.id)

        # Get port for this server
        ports = list(conn.network.ports(device_id=server.id))
        if ports:
            conn.network.update_ip(fip, port_id=ports[0].id)
            print(f"  {server.name}: {fip.floating_ip_address}")

    print("\nDeployment complete!")

if __name__ == "__main__":
    count = int(sys.argv[1]) if len(sys.argv) > 1 else 3
    deploy_web_cluster(count=count)
# Jalankan script
python3 deploy_environment.py 3

# Output:
# Creating network...
# Creating router...
# Creating security group...
# Creating server: web-01
# Creating server: web-02
# Creating server: web-03
#
# Waiting for servers to become active...
#   web-01: ACTIVE
#   web-02: ACTIVE
#   web-03: ACTIVE
#
# Assigning floating IPs...
#   web-01: 203.0.113.40
#   web-02: 203.0.113.41
#   web-03: 203.0.113.42
#
# Deployment complete!

# Test semua VM
for ip in 203.0.113.40 203.0.113.41 203.0.113.42; do
  echo "--- $ip ---"
  curl -s http://$ip | grep -o '<h1>.*</h1>'
done
# --- 203.0.113.40 ---
# <h1>Server web-01</h1>
# --- 203.0.113.41 ---
# <h1>Server web-02</h1>
# --- 203.0.113.42 ---
# <h1>Server web-03</h1>
Script: Cleanup Old Snapshots
# cleanup_snapshots.py
import openstack
from datetime import datetime, timedelta

conn = openstack.connect(cloud='openstack')

RETENTION_DAYS = 30
cutoff = datetime.utcnow() - timedelta(days=RETENTION_DAYS)

deleted = 0
for image in conn.image.images():
    if not image.name.startswith("snap-"):
        continue

    created = datetime.fromisoformat(image.created_at.replace("Z", "+00:00"))
    if created.replace(tzinfo=None) < cutoff:
        print(f"Deleting old snapshot: {image.name} (created {image.created_at})")
        conn.image.delete_image(image.id)
        deleted += 1

print(f"\nDeleted {deleted} snapshots older than {RETENTION_DAYS} days")
python3 cleanup_snapshots.py
# Deleting old snapshot: snap-web-01-20260201 (created 2026-02-01T10:00:00Z)
# Deleting old snapshot: snap-web-01-20260205 (created 2026-02-05T10:00:00Z)
# Deleting old snapshot: snap-db-01-20260201 (created 2026-02-01T10:00:00Z)
#
# Deleted 3 snapshots older than 30 days
Script: Capacity Report
# capacity_report.py
import openstack

conn = openstack.connect(cloud='openstack')

print("=" * 60)
print("OPENSTACK CAPACITY REPORT")
print("=" * 60)

# Hypervisor stats
total_vcpus = 0
used_vcpus = 0
total_ram = 0
used_ram = 0
total_disk = 0
used_disk = 0
running_vms = 0

for hv in conn.compute.hypervisors(details=True):
    total_vcpus += hv.vcpus
    used_vcpus += hv.vcpus_used
    total_ram += hv.memory_size
    used_ram += hv.memory_used
    total_disk += hv.local_disk_size
    used_disk += hv.local_disk_used
    running_vms += hv.running_vms

    print(f"\nHypervisor: {hv.name}")
    print(f"  CPU: {hv.vcpus_used}/{hv.vcpus} vCPUs "
          f"({hv.vcpus_used/hv.vcpus*100:.1f}%)")
    print(f"  RAM: {hv.memory_used/1024:.1f}/{hv.memory_size/1024:.1f} GB "
          f"({hv.memory_used/hv.memory_size*100:.1f}%)")
    print(f"  Disk: {hv.local_disk_used}/{hv.local_disk_size} GB "
          f"({hv.local_disk_used/hv.local_disk_size*100:.1f}%)")
    print(f"  VMs: {hv.running_vms}")

print(f"\n{'='*60}")
print(f"TOTAL CLUSTER")
print(f"  vCPUs: {used_vcpus}/{total_vcpus} "
      f"({used_vcpus/total_vcpus*100:.1f}% used)")
print(f"  RAM: {used_ram/1024:.1f}/{total_ram/1024:.1f} GB "
      f"({used_ram/total_ram*100:.1f}% used)")
print(f"  Disk: {used_disk}/{total_disk} GB "
      f"({used_disk/total_disk*100:.1f}% used)")
print(f"  Total running VMs: {running_vms}")
print(f"{'='*60}")
python3 capacity_report.py

# Output:
# ============================================================
# OPENSTACK CAPACITY REPORT
# ============================================================
#
# Hypervisor: compute1
#   CPU: 12/16 vCPUs (75.0%)
#   RAM: 24.0/32.0 GB (75.0%)
#   Disk: 120/500 GB (24.0%)
#   VMs: 5
#
# Hypervisor: compute2
#   CPU: 8/16 vCPUs (50.0%)
#   RAM: 16.0/32.0 GB (50.0%)
#   Disk: 80/500 GB (16.0%)
#   VMs: 3
#
# ============================================================
# TOTAL CLUSTER
#   vCPUs: 20/32 (62.5% used)
#   RAM: 40.0/64.0 GB (62.5% used)
#   Disk: 200/1000 GB (20.0% used)
#   Total running VMs: 8
# ============================================================
25. Load Balancer as a Service (Octavia)
Octavia menyediakan load balancer yang fully managed dalam OpenStack — buat, konfigurasi, dan hapus load balancer lewat API atau CLI.
Install dan Setup Octavia
# Di controller
sudo apt-get install -y octavia-api octavia-worker \
  octavia-health-manager octavia-housekeeping \
  python3-octaviaclient

# Buat database
sudo mysql -u root -p << 'EOF'
CREATE DATABASE octavia;
GRANT ALL PRIVILEGES ON octavia.* TO 'octavia'@'localhost' IDENTIFIED BY 'Secret1234!';
GRANT ALL PRIVILEGES ON octavia.* TO 'octavia'@'%' IDENTIFIED BY 'Secret1234!';
EOF

# Keystone user dan endpoint
openstack user create --domain default --password Secret1234! octavia
openstack role add --project service --user octavia admin
openstack service create --name octavia --description "OpenStack LBaaS" load-balancer

openstack endpoint create --region RegionOne load-balancer public http://controller:9876
openstack endpoint create --region RegionOne load-balancer internal http://controller:9876
openstack endpoint create --region RegionOne load-balancer admin http://controller:9876
Lab: Buat Load Balancer untuk Web Cluster
# Buat load balancer di subnet internal
openstack loadbalancer create \
  --name web-lb \
  --vip-subnet-id internal-subnet \
  --wait

# Output:
# +---------------------+--------------------------------------+
# | Field               | Value                                |
# +---------------------+--------------------------------------+
# | admin_state_up      | True                                 |
# | id                  | lb-uuid-xxxx                         |
# | name                | web-lb                               |
# | operating_status    | ONLINE                               |
# | provisioning_status | ACTIVE                               |
# | vip_address         | 10.10.0.100                          |
# | vip_network_id      | 77777777-8888-9999-aaaa-bbbbbbbbbbbb |
# | vip_subnet_id       | cccccccc-dddd-eeee-ffff-000000000000 |
# +---------------------+--------------------------------------+

# Buat listener (port yang di-listen)
openstack loadbalancer listener create \
  --name web-listener \
  --protocol HTTP \
  --protocol-port 80 \
  --wait \
  web-lb

# Buat pool (grup backend server)
openstack loadbalancer pool create \
  --name web-pool \
  --lb-algorithm ROUND_ROBIN \
  --listener web-listener \
  --protocol HTTP \
  --wait

# Tambahkan member (backend server) ke pool
openstack loadbalancer member create \
  --subnet-id internal-subnet \
  --address 10.10.0.5 \
  --protocol-port 80 \
  --wait \
  web-pool

openstack loadbalancer member create \
  --subnet-id internal-subnet \
  --address 10.10.0.6 \
  --protocol-port 80 \
  --wait \
  web-pool

openstack loadbalancer member create \
  --subnet-id internal-subnet \
  --address 10.10.0.7 \
  --protocol-port 80 \
  --wait \
  web-pool

# Buat health monitor (auto remove unhealthy member)
openstack loadbalancer healthmonitor create \
  --delay 5 \
  --max-retries 3 \
  --timeout 3 \
  --type HTTP \
  --url-path / \
  --wait \
  web-pool

# List members
openstack loadbalancer member list web-pool

# Output:
# +------+------+-----------+---------------+-------+--------+----------------+
# | id   | name | address   | protocol_port | weight | status | operating_stat |
# +------+------+-----------+---------------+-------+--------+----------------+
# | ...  |      | 10.10.0.5 |            80 |      1 | ONLINE | ONLINE         |
# | ...  |      | 10.10.0.6 |            80 |      1 | ONLINE | ONLINE         |
# | ...  |      | 10.10.0.7 |            80 |      1 | ONLINE | ONLINE         |
# +------+------+-----------+---------------+-------+--------+----------------+

# Assign floating IP ke VIP load balancer
LB_VIP_PORT=$(openstack loadbalancer show web-lb -f value -c vip_port_id)

openstack floating ip create public
# floating_ip_address: 203.0.113.50

openstack floating ip set --port $LB_VIP_PORT 203.0.113.50

# Test load balancer — setiap request diarahkan ke server berbeda (round robin)
for i in $(seq 1 6); do
  curl -s http://203.0.113.50 | grep -o '<h1>.*</h1>'
done

# Output:
# <h1>Server web-01</h1>
# <h1>Server web-02</h1>
# <h1>Server web-03</h1>
# <h1>Server web-01</h1>
# <h1>Server web-02</h1>
# <h1>Server web-03</h1>
HTTPS Termination di Load Balancer
# Upload certificate
openstack loadbalancer listener create \
  --name https-listener \
  --protocol TERMINATED_HTTPS \
  --protocol-port 443 \
  --default-tls-container-ref \
    http://controller:9311/v1/containers/cert-uuid \
  --wait \
  web-lb
26. Ironic — Bare Metal Provisioning
Ironic menyediakan bare metal server sebagai resource OpenStack, sama seperti Nova menyediakan VM. Bedanya: server fisik tanpa hypervisor, OS langsung diinstall ke hardware.
Kapan Pakai Ironic
- Database besar yang butuh direct disk access
- High-performance computing (HPC)
- Machine learning training yang butuh GPU langsung
- Workload yang tidak boleh share hardware (compliance)
- Performa I/O atau network yang tidak bisa terpenuhi oleh VM
Alur Provisioning Ironic
User: openstack baremetal node provide node-01
       │
       ▼
[1] Ironic API → terima request
       │
       ▼
[2] Ironic Conductor → konfigurasi BMC (IPMI/iLO/iDRAC)
       │
       ├──► [3] PXE boot → server boot dari network
       │
       ├──► [4] IPA (Ironic Python Agent) → jalan di RAM, write image ke disk
       │
       └──► [5] Boot dari disk → OS running
# Register bare metal node
openstack baremetal node create \
  --driver ipmi \
  --driver-info ipmi_address=10.0.0.100 \
  --driver-info ipmi_username=admin \
  --driver-info ipmi_password=server-bmc-pass \
  --property cpus=32 \
  --property memory_mb=131072 \
  --property local_gb=1000 \
  --name bm-node-01

# Output:
# +-------------------+--------------------------------------+
# | Field             | Value                                |
# +-------------------+--------------------------------------+
# | driver            | ipmi                                 |
# | name              | bm-node-01                           |
# | provision_state   | enroll                               |
# | uuid              | bm-uuid-xxxx                         |
# +-------------------+--------------------------------------+

# Buat port (MAC address NIC server)
openstack baremetal port create \
  --node bm-uuid-xxxx \
  AA:BB:CC:DD:EE:FF

# Set node ke available
openstack baremetal node manage bm-node-01
openstack baremetal node provide bm-node-01

# Buat flavor khusus bare metal
openstack flavor create \
  --ram 131072 \
  --disk 1000 \
  --vcpus 32 \
  --property resources:CUSTOM_BAREMETAL=1 \
  baremetal.xlarge

# Deploy OS ke bare metal — perintahnya sama seperti buat VM!
openstack server create \
  --flavor baremetal.xlarge \
  --image "Ubuntu 22.04 LTS" \
  --key-name my-key \
  --network provider-net \
  bm-server-01

# Progress:
# enroll → manageable → available → deploying → active
# (proses 5-15 menit tergantung ukuran image dan kecepatan network)

# Setelah active — ini server fisik yang kamu kontrol
openstack server show bm-server-01 -f value -c status
# ACTIVE

ssh ubuntu@10.0.0.101 -i ~/.ssh/id_ed25519
# ubuntu@bm-server-01:~$ lscpu | grep "Model name"
# Model name: Intel(R) Xeon(R) Gold 6248 CPU @ 2.50GHz
# (ini output dari hardware fisik, bukan virtual)
27. Manila — Shared Filesystem as a Service
Manila menyediakan shared filesystem (NFS/CIFS) yang bisa di-mount oleh beberapa VM sekaligus. Berguna untuk aplikasi yang butuh shared storage seperti web server cluster, media processing, atau home directory.
Perbedaan Manila vs Cinder vs Swift
| Aspek | Cinder (Block) | Swift (Object) | Manila (File) |
|---|---|---|---|
| Tipe | Block device | HTTP REST | Shared filesystem |
| Akses | 1 VM per volume (umumnya) | Multi-client via API | Multi-VM via NFS/CIFS |
| Protokol | iSCSI/RBD | HTTP | NFS, CIFS, CephFS |
| Use case | Database, boot disk | Backup, media file | Shared content, logs |
| Mount | /dev/vdb |
Tidak di-mount | /mnt/shared |
Lab: Buat Shared Filesystem
# Pastikan Manila sudah terinstall dan running
openstack share service list

# Output:
# +-----+--------+------+------+---------+-------+
# | Id  | Host   | Zone | Stat | Status  | State |
# +-----+--------+------+------+---------+-------+
# | 1   | ctrl@lvm | nova | enab | enabled | up    |
# +-----+--------+------+------+---------+-------+

# Buat share type
openstack share type create nfs-share True

# Buat share 50GB dengan NFS
openstack share create NFS 50 \
  --name project-shared \
  --description "Shared storage for dev team"

# Output:
# +----------------------+--------------------------------------+
# | Field                | Value                                |
# +----------------------+--------------------------------------+
# | id                   | share-uuid-xxxx                      |
# | name                 | project-shared                       |
# | share_proto          | NFS                                  |
# | size                 | 50                                   |
# | status               | available                            |
# | share_type           | nfs-share                            |
# +----------------------+--------------------------------------+

# Buat access rule — izinkan IP range mengakses share
openstack share access create project-shared ip 10.10.0.0/24 --access-level rw

# Output:
# +--------------+--------------------------------------+
# | Field        | Value                                |
# +--------------+--------------------------------------+
# | access_type  | ip                                   |
# | access_to    | 10.10.0.0/24                         |
# | access_level | rw                                   |
# | state        | active                               |
# +--------------+--------------------------------------+

# Lihat export path
openstack share show project-shared | grep export_locations

# Output:
# | export_locations | path = 10.0.0.11:/shares/share-uuid-xxxx |

# Mount di VM (semua VM di subnet bisa mount ini)
ssh ubuntu@10.10.0.5
sudo apt-get install -y nfs-common
sudo mkdir /mnt/shared
sudo mount -t nfs 10.0.0.11:/shares/share-uuid-xxxx /mnt/shared

# Verifikasi
df -h /mnt/shared
# Filesystem                                    Size  Used Avail Use% Mounted on
# 10.0.0.11:/shares/share-uuid-xxxx              50G  256K   50G   1% /mnt/shared

# Buat file dari VM pertama
echo "Hello from web-01" | sudo tee /mnt/shared/test.txt

# Baca dari VM kedua
ssh ubuntu@10.10.0.6
sudo mount -t nfs 10.0.0.11:/shares/share-uuid-xxxx /mnt/shared
cat /mnt/shared/test.txt
# Hello from web-01

# Auto-mount via /etc/fstab
echo "10.0.0.11:/shares/share-uuid-xxxx /mnt/shared nfs defaults 0 0" \
  | sudo tee -a /etc/fstab
28. Barbican — Key Management Service
Barbican menyimpan secret (password, certificate, encryption key) secara aman. Digunakan oleh service OpenStack lain untuk encrypt data at rest, TLS certificate management, dan symmetric key storage.
Lab: Simpan dan Retrieve Secret
# Simpan password database
openstack secret store \
  --name "db-password-prod" \
  --payload "SuperS3cretDB!Pass" \
  --payload-content-type "text/plain"

# Output:
# +---------------+---------------------------------------------------------------+
# | Field         | Value                                                         |
# +---------------+---------------------------------------------------------------+
# | Secret href   | http://controller:9311/v1/secrets/secret-uuid-1234           |
# | Name          | db-password-prod                                             |
# | Created       | 2026-03-10T10:30:00                                          |
# | Status        | ACTIVE                                                       |
# | Content types | {'default': 'text/plain'}                                    |
# | Algorithm     | aes                                                          |
# | Bit length    | 256                                                          |
# | Mode          | cbc                                                          |
# +---------------+---------------------------------------------------------------+

# Retrieve secret
openstack secret get http://controller:9311/v1/secrets/secret-uuid-1234 --payload

# Output:
# +---------+--------------------+
# | Field   | Value              |
# +---------+--------------------+
# | Payload | SuperS3cretDB!Pass |
# +---------+--------------------+

# List semua secrets
openstack secret list

# Output:
# +-------------------------------------------+------------------+--------+
# | Secret href                               | Name             | Status |
# +-------------------------------------------+------------------+--------+
# | http://controller:9311/v1/secrets/sec-1.. | db-password-prod | ACTIVE |
# | http://controller:9311/v1/secrets/sec-2.. | api-key-staging  | ACTIVE |
# +-------------------------------------------+------------------+--------+

# Generate symmetric key
openstack secret order create key \
  --name "encryption-key" \
  --algorithm aes \
  --bit-length 256

# Simpan TLS certificate
openstack secret store \
  --name "web-tls-cert" \
  --payload-content-type "application/pkix-cert" \
  --payload "$(cat /etc/ssl/certs/web.crt)"

# Hapus secret
openstack secret delete http://controller:9311/v1/secrets/secret-uuid-1234
Barbican untuk Cinder Volume Encryption
# Buat encryption type untuk volume type
openstack volume type create encrypted-vol
openstack volume type set --encryption-provider nova.volume.encryptors.luks.LuksEncryptor \
  --encryption-cipher aes-xts-plain64 \
  --encryption-key-size 256 \
  --encryption-control-location front-end \
  encrypted-vol

# Buat encrypted volume
openstack volume create --size 20 --type encrypted-vol secure-data

# Barbican otomatis generate dan simpan encryption key
# Volume di-encrypt dengan LUKS, key disimpan di Barbican
# Tanpa akses ke Barbican, data di volume tidak bisa dibaca
29. Cloud-Init dan User Data — Detail
Cloud-init adalah tool standar untuk konfigurasi awal VM saat pertama kali boot. Mendukung berbagai format: shell script, cloud-config YAML, compressed archive.
Format Cloud-Config
#cloud-config
# File ini dikirim sebagai user_data saat buat VM

# Update dan install paket
package_update_flag: true
package_upgrade_flag: true
packages_list:
  - nginx
  - htop
  - curl
  - jq
  - unzip
  - fail2ban

# Buat user
users:
  - name: deploy
    groups: sudo, docker
    shell: /bin/bash
    sudo: ALL=(ALL) NOPASSWD:ALL
    ssh_authorized_keys:
      - ssh-ed25519 AAAAC3...key-content... deploy@company.com

# Tulis file
write_files:
  - path: /etc/nginx/sites-available/default
    content: |
      server {
          listen 80;
          server_name _;
          root /var/www/html;
          index index.html;
          location / {
              try_files $uri $uri/ =404;
          }
      }
    owner: root:root
    permissions: '0644'

  - path: /var/www/html/index.html
    content: |
      <h1>Server deployed via OpenStack</h1>
      <p>Instance: ${HOSTNAME}</p>
    owner: www-data:www-data
    permissions: '0644'

  - path: /etc/fail2ban/jail.local
    content: |
      [sshd]
      enabled = true
      port = ssh
      filter = sshd
      maxretry = 5
      bantime = 3600

# Jalankan command
runcmd:
  - systemctl enable --now nginx
  - systemctl enable --now fail2ban
  - ufw allow 22/tcp
  - ufw allow 80/tcp
  - ufw allow 443/tcp
  - ufw --force enable

# Set timezone
timezone: Asia/Jakarta

# Set hostname
hostname: web-prod-01
fqdn: web-prod-01.cloud.example.com

# Reboot setelah selesai (opsional)
power_state:
  mode: reboot
  message: "Cloud-init complete, rebooting..."
  timeout: 30
  condition: true

final_message: "Cloud-init completed in $UPTIME seconds"
# Deploy VM dengan cloud-config
openstack server create \
  --flavor m1.small \
  --image "Ubuntu 22.04 LTS" \
  --key-name my-key \
  --network internal-net \
  --user-data /tmp/cloud-config.yaml \
  web-prod-01

# Cek progress cloud-init dari console log
openstack console log show web-prod-01 | grep -E "cloud-init|ci-info"

# Output:
# ci-info: ++++++++++++++++++Net device info+++++++++++++++++++
# ci-info: +--------+------+-----+----------+------+----------+
# ci-info: | Device |  Up  | Addr|   Mask   | Scope|  Hw-Addr |
# ci-info: +--------+------+-----+----------+------+----------+
# ci-info: |  eth0  | True |10.10| 255.255. | glob | fa:16:3e |
# ci-info: +--------+------+-----+----------+------+----------+
# Cloud-init v. 23.4 running 'modules:final'...
# Cloud-init completed in 45 seconds
Multi-part User Data
Kirim beberapa script dan config sekaligus:
# Buat multi-part MIME message
cat > /tmp/write-mime.py << 'PYTHON'
import email.mime.multipart
import email.mime.text
import sys

msg = email.mime.multipart.MIMEMultipart()

# Part 1: cloud-config
cloud_config = """#cloud-config
packages_list:
  - nginx
  - htop
"""
msg.attach(email.mime.text.MIMEText(cloud_config, 'cloud-config'))

# Part 2: shell script
shell_script = """#!/bin/bash
echo "Setup complete at $(date)" >> /var/log/setup.log
curl -s ifconfig.me >> /var/log/setup.log
"""
msg.attach(email.mime.text.MIMEText(shell_script, 'x-shellscript'))

with open('/tmp/multipart-userdata.txt', 'w') as f:
    f.write(str(msg))
PYTHON

python3 /tmp/write-mime.py

# Deploy dengan multi-part user data
openstack server create \
  --flavor m1.small \
  --image "Ubuntu 22.04 LTS" \
  --key-name my-key \
  --network internal-net \
  --user-data /tmp/multipart-userdata.txt \
  multi-config-vm
30. Tips Production Deployment
Kumpulan tips yang sering ditemukan di lapangan saat menjalankan OpenStack di production.
1. Jangan Pakai DevStack untuk Production
DevStack menyimpan data di tmpfs, menggunakan SQLite di beberapa tempat, dan tidak survive reboot. Gunakan Kolla-Ansible atau OpenStack-Ansible untuk deployment production.
2. Gunakan Odd Number untuk Cluster
MariaDB Galera, RabbitMQ, dan Ceph Monitor semuanya butuh quorum. Selalu deploy dalam jumlah ganjil: 3 atau 5 node. Kalau 2 dari 4 mati, cluster tidak punya quorum dan berhenti.
3. Pisahkan Network
Minimal 3 network segment di production:
Management Network (10.0.0.0/24)    → komunikasi antar service OpenStack
Provider Network (203.0.113.0/24)   → traffic external/internet
Storage Network (10.0.1.0/24)       → traffic Ceph/iSCSI/NFS
Kalau semua jalan di satu network, disk I/O dari Ceph bisa mengganggu API response time.
4. Monitor Sebelum Live
Pasang Prometheus + Grafana + alerting SEBELUM ada user. Bukan setelah ada masalah baru pasang monitoring.
5. Automate Semua Hal
Jangan pernah konfigurasi server manual. Gunakan Ansible untuk provisioning, Terraform untuk resource management, dan Git untuk version control semua konfigurasi.
6. Test Failure Scenario
Sebelum production: matikan satu compute node, matikan satu controller, matikan satu OSD Ceph. Lihat apa yang terjadi dan berapa lama recovery. Ini harus dilakukan SEBELUM ada user beneran.
7. Dokumentasi Internal
Catat: bagaimana deploy, bagaimana upgrade, bagaimana backup, bagaimana restore, siapa punya akses admin. Simpan di wiki internal (Confluence, BookStack, atau bahkan Git repo markdown).
8. Capacity Planning
Pantau growth trend setiap bulan. Kalau utilisasi compute sudah 70%, mulai perencanaan tambah hardware. Proses procurement hardware bisa makan waktu 2-4 bulan.
# Script sederhana untuk weekly capacity email
cat > /usr/local/bin/capacity-check.sh << 'SCRIPT'
#!/bin/bash
source /root/adminrc

echo "=== OpenStack Weekly Capacity Report ==="
echo "Date: $(date)"
echo ""

STATS=$(openstack hypervisor stats show -f json)

TOTAL_VCPU=$(echo $STATS | jq '.vcpus')
USED_VCPU=$(echo $STATS | jq '.vcpus_used')
TOTAL_RAM=$(echo $STATS | jq '.memory_mb')
USED_RAM=$(echo $STATS | jq '.memory_mb_used')
TOTAL_DISK=$(echo $STATS | jq '.local_gb')
USED_DISK=$(echo $STATS | jq '.local_gb_used')
TOTAL_VMS=$(echo $STATS | jq '.running_vms')

CPU_PCT=$(echo "scale=1; $USED_VCPU * 100 / $TOTAL_VCPU" | bc)
RAM_PCT=$(echo "scale=1; $USED_RAM * 100 / $TOTAL_RAM" | bc)
DISK_PCT=$(echo "scale=1; $USED_DISK * 100 / $TOTAL_DISK" | bc)

echo "vCPU: $USED_VCPU / $TOTAL_VCPU ($CPU_PCT%)"
echo "RAM:  $USED_RAM / $TOTAL_RAM MB ($RAM_PCT%)"
echo "Disk: $USED_DISK / $TOTAL_DISK GB ($DISK_PCT%)"
echo "VMs:  $TOTAL_VMS running"

if (( $(echo "$CPU_PCT > 70" | bc -l) )); then
  echo ""
  echo "WARNING: CPU utilization above 70% — plan for expansion"
fi

if (( $(echo "$RAM_PCT > 70" | bc -l) )); then
  echo ""
  echo "WARNING: RAM utilization above 70% — plan for expansion"
fi
SCRIPT

chmod +x /usr/local/bin/capacity-check.sh

# Jalankan
/usr/local/bin/capacity-check.sh

# Output:
# === OpenStack Weekly Capacity Report ===
# Date: Mon Mar 10 12:00:00 WIB 2026
#
# vCPU: 20 / 32 (62.5%)
# RAM:  40960 / 65536 MB (62.5%)
# Disk: 200 / 1000 GB (20.0%)
# VMs:  8 running
9. Versioning dan Change Management
# Simpan semua config di Git
cd /etc
sudo git init
sudo git add keystone/ nova/ neutron/ cinder/ glance/ haproxy/ rabbitmq/
sudo git commit -m "Initial config snapshot"

# Sebelum setiap perubahan
sudo git diff
sudo git add -A
sudo git commit -m "Enable DVR on Neutron"

# Rollback kalau bermasalah
sudo git log --oneline
# abc1234 Enable DVR on Neutron
# def5678 Initial config snapshot

sudo git checkout def5678 -- neutron/
sudo systemctl restart neutron-server
10. Upgrade Window
Lakukan upgrade di luar jam kerja. Siapkan rollback plan. Backup database tepat sebelum upgrade. Test di staging environment yang identik dengan production sebelum eksekusi. Pastikan semua team yang terdampak sudah dinotifikasi.
31. Cheat Sheet — Command yang Paling Sering Dipakai
Identity (Keystone)
openstack token issue                          # cek koneksi
openstack project list                         # list project
openstack user list                            # list user
openstack role assignment list --names          # lihat siapa punya role apa
openstack service list                         # list service terdaftar
openstack endpoint list                        # list endpoint
Compute (Nova)
openstack server list                          # list VM
openstack server show <vm>                     # detail VM
openstack server create --flavor ... --image ...  # buat VM
openstack server delete <vm>                   # hapus VM
openstack server stop/start/reboot <vm>        # lifecycle
openstack server migrate --live <host> <vm>    # live migration
openstack server resize --flavor <new> <vm>    # resize
openstack server image create <vm> <name>      # snapshot
openstack console log show <vm>                # serial console output
openstack console url show <vm>                # VNC URL
openstack hypervisor list                      # list compute node
openstack hypervisor stats show                # cluster stats
openstack flavor list                          # list flavor
openstack keypair list                         # list SSH key
Network (Neutron)
openstack network list                         # list network
openstack subnet list                          # list subnet
openstack router list                          # list router
openstack port list                            # list port
openstack floating ip list                     # list floating IP
openstack floating ip create <external-net>    # alokasi FIP
openstack server add floating ip <vm> <ip>     # assign FIP
openstack security group list                  # list SG
openstack security group rule list <sg>        # list rules SG
openstack network agent list                   # status agent
Image (Glance)
openstack image list                           # list image
openstack image show <image>                   # detail image
openstack image create --file ... --disk-format ...  # upload image
openstack image delete <image>                 # hapus image
Block Storage (Cinder)
openstack volume list                          # list volume
openstack volume create --size <GB> <name>     # buat volume
openstack server add volume <vm> <vol>         # attach
openstack server remove volume <vm> <vol>      # detach
openstack volume snapshot create <vol>         # snapshot
openstack volume backup create <vol>           # backup ke Swift
openstack volume backup restore <backup> <vol> # restore
openstack volume type list                     # list type
Object Storage (Swift)
openstack container list                       # list container
openstack container create <name>              # buat container
openstack object create <container> <file>     # upload
openstack object save <container> <obj>        # download
openstack object list <container>              # list object
Orchestration (Heat)
openstack stack create --template <file> <name>  # deploy
openstack stack list                             # list stack
openstack stack event list <stack>               # events
openstack stack output show <stack> <key>        # output
openstack stack delete <stack>                   # hapus semua resource
Load Balancer (Octavia)
openstack loadbalancer list                    # list LB
openstack loadbalancer create --name ... --vip-subnet ...
openstack loadbalancer listener create ...
openstack loadbalancer pool create ...
openstack loadbalancer member create ...
openstack loadbalancer healthmonitor create ...
Admin
openstack compute service list                 # status compute
openstack network agent list                   # status network
openstack volume service list                  # status storage
openstack quota show <project>                 # lihat quota
openstack quota set --instances 50 <project>   # set quota
openstack limits show --absolute               # usage vs limit
openstack usage show --project <project>       # usage report
32. OpenStack REST API — Bedah API Secara Manual
Semua command openstack CLI dan interaksi Horizon Dashboard pada dasarnya melakukan panggilan HTTP REST API ke service-service OpenStack. Memahami cara kerja API langsung via curl sangat penting untuk integrasi dengan sistem eksternal atau debugging tingkat lanjut.
Autentikasi dan Token (Keystone API v3)
Semua request ke OpenStack API membutuhkan token autentikasi di header X-Auth-Token.
# Payload untuk permintaan token
cat > auth.json << 'EOF'
{
    "auth": {
        "identity": {
            "methods": ["password"],
            "password": {
                "user": {
                    "domain": {"name": "Default"},
                    "name": "admin",
                    "password": "Secret1234!"
                }
            }
        },
        "scope": {
            "project": {
                "domain": {"name": "Default"},
                "name": "admin"
            }
        }
    }
}
EOF

# Dapatkan Token dari Keystone
# Token dikembalikan di header response "X-Subject-Token"
curl -i -s -X POST http://controller:5000/v3/auth/tokens \
  -H "Content-Type: application/json" \
  -d @auth.json | grep X-Subject-Token

# Output:
# X-Subject-Token: gAAAAABmX...

# Simpan token ke variable
export TOKEN=$(curl -s -D - -X POST http://controller:5000/v3/auth/tokens \
  -H "Content-Type: application/json" -d @auth.json \
  | grep X-Subject-Token | awk '{print $2}' | tr -d '\r')
Nova API (Compute Service)
Setelah memiliki token, Anda bisa menggunakan API service mana pun yang terdaftar di Service Catalog.
# Dapatkan list semua VM (Server)
curl -s -X GET http://controller:8774/v2.1/servers/detail \
  -H "X-Auth-Token: $TOKEN" | jq '.servers[] | {id: .id, name: .name, status: .status}'

# Output (contoh JSON parse dengan jq):
# {
#   "id": "e305e553-61b9-46dc-a09c-0cdddc661582",
#   "name": "web-01",
#   "status": "ACTIVE"
# }

# Buat VM dengan API
cat > create_server.json << 'EOF'
{
    "server": {
        "name": "api-test-vm",
        "imageRef": "f1e2d3c4-b5a6-7890-abcd-ef0123456789",
        "flavorRef": "1",
        "networks": [{"uuid": "77777777-8888-9999-aaaa-bbbbbbbbbbbb"}],
        "key_name": "my-key"
    }
}
EOF

curl -s -X POST http://controller:8774/v2.1/servers \
  -H "X-Auth-Token: $TOKEN" \
  -H "Content-Type: application/json" \
  -d @create_server.json | jq .
Neutron API (Networking Service)
# List Network
curl -s -X GET http://controller:9696/v2.0/networks \
  -H "X-Auth-Token: $TOKEN" | jq '.networks[] | {id: .id, name: .name}'

# Buat Port di Network tertentu
cat > create_port.json << 'EOF'
{
    "port": {
        "network_id": "77777777-8888-9999-aaaa-bbbbbbbbbbbb",
        "name": "api-port",
        "admin_state_up": true
    }
}
EOF

curl -s -X POST http://controller:9696/v2.0/ports \
  -H "X-Auth-Token: $TOKEN" \
  -H "Content-Type: application/json" \
  -d @create_port.json | jq .
33. Designate — DNS as a Service (Deep Dive)
Designate memungkinkan pengelolaan zona DNS secara dinamis dan memiliki fitur auto-populate DNS record setiap kali ada VM yang dibuat di Nova.
Arsitektur Designate
┌────────────────┐      ┌─────────────────┐      ┌─────────────┐
│ OpenStack Nova │ ───► │ Designate Sink  │ ───► │ Designate  │
│ OpenStack Net  │      │ (Listen events) │      │ Central    │
└────────────────┘      └─────────────────┘      └──────┬──────┘
                                                        │
                                                 ┌──────▼──────┐
                                                 │ Designate  │
                                                 │ MDNS       │ (Mini DNS)
                                                 └──────┬──────┘
                                                        │ AXFR (Zone Transfer)
                                                 ┌──────▼──────┐
                                                 │ BIND9/     │ (Backend External)
                                                 │ PowerDNS   │
                                                 └─────────────┘
Konfigurasi Nova ke Designate
Agar VM otomatis mendapat nama domain saat FIP (Floating IP) dipasang, gabungkan Neutron dan Designate di file neutron.conf.
# /etc/neutron/neutron.conf
[DEFAULT]
external_dns_driver = designate

[designate]
url = http://controller:9001/v2
auth_type = password
auth_url = http://controller:5000/v3
project_domain_name = Default
user_domain_name = Default
project_name = service
username = designate
password = Secret1234!
allow_reverse_dns_lookup = True
ipv4_ptr_zone_prefix_size = 24
# Setup zona reverse DNS untuk public network (contoh 203.0.113.x)
openstack zone create --email admin@example.com 113.0.203.in-addr.arpa.

# Saat assign FIP ke VM, Neutron akan call Designate otomatis
# Buat VM dengan parameter --dns-name
openstack server create \
  --flavor m1.small \
  --image "Ubuntu 22.04 LTS" \
  --network provider-net \
  --property dns_name=web-01 \
  web-01

# Dan assign FIP
openstack floating ip set --port <port-id> <fip-address>

# Result di DNS backend:
# A record: web-01.cloud.example.com. IN A 203.0.113.10
# PTR record: 10.113.0.203.in-addr.arpa. IN PTR web-01.cloud.example.com.
Sinkronisasi Designate (Pool Manager)
Designate mengelola ratusan DNS backend (BIND9 server) lewat konsep Pools. Pool di-define di pools.yaml.
# /etc/designate/pools.yaml
- name: default
  description: Default Pool
  attributes: {}
  ns_records:
    - hostname: ns1.example.com.
      priority: 1
    - hostname: ns2.example.com.
      priority: 2
  nameservers:
    - host: 10.0.0.91
      port: 53
    - host: 10.0.0.92
      port: 53
  targets:
    - type: bind9
      description: BIND9 Server 1
      masters:
        - host: 10.0.0.11    # Designate MDNS node
          port: 5354
      options:
        host: 10.0.0.91
        port: 53
        rndc_host: 10.0.0.91
        rndc_port: 953
        rndc_key_file: /etc/designate/rndc.key
# Update pool configuration
sudo designate-manage pool update

# BIND9 server sekarang akan sinkronisasi otomatis via rndc + AXFR dari Designate
34. Keystone Federation Lanjut — OIDC dengan Keycloak
Identity Federation sering memakai protokol OpenID Connect (OIDC). Contoh setup menggunakan server Keycloak sebagai Identity Provider tersentral untuk perusahaan.
Konfigurasi Apache mod_auth_openidc
# Install modul
sudo apt-get install libapache2-mod-auth-openidc
sudo a2enmod auth_openidc
# Tambahkan ke konfigurasi VirtualHost Keystone (/etc/apache2/sites-available/keystone.conf)
OIDCClaimPrefix "OIDC-"
OIDCResponseType "id_token"
OIDCScope "openid email profile"
OIDCProviderMetadataURL "https://keycloak.company.com/auth/realms/corp/.well-known/openid-configuration"
OIDCClientID "openstack-keystone"
OIDCClientSecret "s3cr3t-from-keycloak"
OIDCCryptoPassphrase "openstack-crypto-pass"
OIDCRedirectURI "https://controller/v3/auth/OS-FEDERATION/websso/oidc/redirect"

<LocationMatch /v3/auth/OS-FEDERATION/websso/oidc>
    AuthType openid-connect
    Require valid-user
    LogLevel debug
</LocationMatch>
# Restart Apache
sudo systemctl restart apache2
Mapping Atribut Keycloak ke Role OpenStack
# /tmp/mapping-oidc.json
[
  {
    "local": [
      {
        "user": {
          "name": "{0}",
          "domain": { "name": "Federated" },
          "type": "ephemeral"
        },
        "group": {
          "name": "{1}",
          "domain": { "name": "Federated" }
        }
      }
    ],
    "remote": [
      { "type": "OIDC-preferred_username" },
      { "type": "OIDC-openstack_group_mapping" }
    ]
  }
]
# Buat Identity Provider di Keystone
openstack identity provider create keycloak \
  --remote-id "https://keycloak.company.com/auth/realms/corp"

# Apply mapping
openstack mapping create keycloak-mapping --rules /tmp/mapping-oidc.json

# Daftarkan protokol
openstack federation protocol create oidc \
  --identity-provider keycloak \
  --mapping keycloak-mapping

# Output ini berarti user Keycloak otomatis memiliki session dan role OpenStack tanpa user lokal!
35. High Availability (HA) Architecture — Deep Dive
High Availability (ketersediaan tinggi) adalah syarat mutlak untuk OpenStack di production. Arsitektur standar OpenStack HA menghilangkan Single Point of Failure (SPOF) dengan mendeploy 3 Controller Node.
Konsep Aktif-Aktif vs Aktif-Pasif
Sebagian besar layanan OpenStack bersifat stateless, sehingga dapat dijalankan dalam mode Aktif-Aktif (semua node melayani request secara bersamaan).
- Aktif-Aktif: Nova API, Neutron Server, Glance API, Keystone API
- Aktif-Pasif: Layanan yang tidak bisa berjalan bersamaan tanpa corrupt data, misalnya
neutron-dhcp-agentdancinder-volume. Layanan ini butuh mekanisme failover (misal via Pacemaker atau keepalived).
Komponen HA Utama
1. HAProxy & Keepalived
Di depan ke-3 Controller, kita membutuhkan Load Balancer. HAProxy mendistribusikan traffic API (misal HTTP port 5000/8774) ke 3 controller secara round-robin atau ip-hash. Agar HAProxy itu sendiri tidak menjadi SPOF, kita menggunakan Keepalived untuk memberikan satu buah VIP (Virtual IP). VIP ini berpindah-pindah antar controller. Jika Controller 1 (haproxy master) mati, VIP akan otomatis pindah ke Controller 2 dalam hitungan detik.
2. Galera Cluster (MariaDB)
Database OpenStack memegang peran sangat penting. Kita tak bisa hanya memiliki 1 database. Galera Cluster menyediakan synchronous replication antar 3 MariaDB node. Jika satu node mati, dua node lainnya masih memiliki quorum (mayoritas setuju) dan cluster database tetap beroperasi normal.
Aturan Quorum: Anda selalu butuh jumlah node ganjil (3, 5, atau 7) agar tidak terjadi split-brain.
3. RabbitMQ Cluster
RabbitMQ bertugas sebagai urat nadi komunikasi (Message Queue) antar komponen OpenStack. Nova-compute berkomunikasi dengan Nova-scheduler lewat RabbitMQ.
Mirip seperti Galera, RabbitMQ di-deploy sebagai cluster 3-node dengan policy High Availability (ha-mode: all). Pesan (message) akan disalin (mirrored) ke seluruh node dalam cluster.
Topologi Fisik HA Controller
Pemisahan jaringan sangat penting untuk stabilitas HA.
- Management Network: Jaringan untuk sinkronisasi RabbitMQ dan API antar service.
- Galera Replication Network: Jaringan backend dedicated (kecepatan tinggi, latensi rendah) khusus untuk sinkronisasi database Galera.
- External Network: Jaringan untuk VIP (di-manage oleh Keepalived), digunakan oleh end-user dan alat otomasi (seperti Terraform) untuk mengakses Horizon dan Public API endpoint.
Cara Menguji HA (Chaos Testing)
Praktik terbaik sebelum Go-Live adalah menguji ketangguhannya:
- Jalankan
pingke VIP secara konstan. - Matikan
haproxyservice di Controller 1. (VIP harus pindah ke Controller 2 tanpa putus ping > 2 detik) - Cabut colokan power (atau force power-off VM) dari Controller 2 di tengah-tengah provisioning VM. (VM baru harus tetap terbuat dengan sukses by Controller 3)
- Hentikan MariaDB di Controller 3. Pastikan
openstack server listmasih merespon API request.
Membangun HA OpenStack secara manual itu tingkat kesulitannya sangat tinggi. Inilah alasan utama alat seperti Kolla-Ansible, OpenStack-Ansible, dan TripleO diciptakan—karena memfasilitasi arsitektur 3-Controller HA ini secara otomatis.
Referensi
Dokumentasi Resmi
- OpenStack Documentation — titik masuk semua panduan
- Install Guide — Ubuntu — panduan instalasi per service
- DevStack — all-in-one untuk development
- OpenStack-Ansible — deployment produksi dengan Ansible
- Kolla-Ansible — deployment berbasis Docker container
- OpenStack API Reference
- OpenStack Releases — daftar rilis dan jadwal support
Video
| Topik | Kanal | Link |
|---|---|---|
| OpenStack Full Course | NetworkChuck | YouTube |
| DevStack Installation | LearnLinuxTV | YouTube |
| Neutron Networking Deep Dive | CERN | YouTube |
| Nova Scheduler Explained | OpenInfra | YouTube |
| Kolla-Ansible Production | OpenInfra Summit | YouTube |
| OpenStack + Ceph Storage | FOSDEM | YouTube |
Komunitas
- ask.openstack.org — forum tanya jawab
- OpenStack Discuss — mailing list
- #openstack di OFTC IRC / Matrix
- OpenInfra Slack
Q&A
Q: OpenStack bisa dipakai di satu server biasa, bukan datacenter?
Bisa, lewat DevStack atau MicroStack. Satu server sudah cukup untuk belajar dan eksperimen. Tapi untuk production, minimal butuh: satu controller node, satu atau lebih compute node, dan idealnya satu storage node terpisah.
Q: Apa bedanya OpenStack dan Kubernetes?
Keduanya sering disebut bersama tapi fungsinya berbeda level. OpenStack mengelola infrastruktur fisik — membuat VM, mengatur network virtual, menyediakan storage. Kubernetes mengelola container yang berjalan di atas infrastruktur itu (atau di atas VM yang dibuat OpenStack). OpenStack bisa menjadi platform tempat Kubernetes cluster berjalan lewat service Magnum.
Q: Kenapa instalasi manual OpenStack terasa rumit dibanding cloud publik?
Cloud publik menyembunyikan semua kompleksitas itu. Di balik tombol "Launch Instance" AWS, ada proses yang persis sama — validasi identity, scheduling ke hardware, konfigurasi network virtual, provisioning storage. Bedanya mereka yang tangani semua itu. Belajar OpenStack membuat kita paham cara kerja semua cloud platform.
Q: Apakah KVM wajib untuk OpenStack?
Tidak wajib, tapi paling umum dipakai. Nova mendukung beberapa hypervisor: KVM, QEMU, VMware vSphere, Hyper-V, Xen, dan bahkan LXC. Di lingkungan nested virtualization (VPS di atas VPS), bisa pakai virt_type = qemu di konfigurasi libvirt meski performa lebih rendah.
Q: Perbedaan floating IP dan fixed IP di OpenStack?
Fixed IP adalah alamat internal VM yang di-assign dari subnet tenant network — tidak bisa diakses langsung dari luar. Floating IP adalah alamat dari pool external/provider network yang di-assign secara manual ke VM. Floating IP bisa dipindah antar VM kapanpun tanpa restart, mirip konsep Elastic IP di AWS.
Q: Kenapa perlu RabbitMQ? Bisa diganti tidak?
RabbitMQ dipakai sebagai message broker untuk komunikasi async antar service Nova, Cinder, Neutron, dll. Bisa diganti dengan backend AMQP lain seperti Apache Qpid atau Kafka (dengan beberapa service), tapi RabbitMQ adalah yang paling stabil dan paling banyak dipakai di deployment OpenStack production. Di versi terbaru OpenStack, ada juga opsi pakai oslo.messaging dengan backend ZeroMQ.
Q: Apakah ada cara yang lebih mudah untuk deploy OpenStack ke production?
Ya. Ada tiga opsi utama yang banyak dipakai:
- OpenStack-Ansible — pakai Ansible playbook, jalan di bare metal maupun VM, konfigurasi via YAML
- Kolla-Ansible — sama pakai Ansible, tapi setiap service OpenStack jalan dalam Docker container, lebih mudah upgrade
- TripleO / Director — khusus Red Hat OpenStack Platform, pakai OpenStack di atas OpenStack untuk deploy
Untuk tim kecil yang baru mulai, Kolla-Ansible biasanya paling straightforward dengan dokumentasi yang cukup lengkap.
Q: Apa itu availability zone dan aggregate di Nova?
Availability zone adalah label logical yang di-assign ke grup compute node. Saat buat VM, user bisa pilih availability zone tertentu (misal: "zone-a"). Host aggregate adalah mekanisme admin untuk mengelompokkan compute node berdasarkan karakteristik hardware (misal: node yang punya SSD, atau node khusus GPU) dan mapping ke availability zone. User reguler hanya lihat availability zone, admin yang manage aggregate di baliknya.
Q: VM di OpenStack tidak bisa ping ke internet setelah dibuat, kenapa?
Ada beberapa penyebab umum. Pertama cek security group — by default tidak ada rule yang mengizinkan outbound maupun inbound ICMP. Kedua cek apakah router sudah punya external gateway dan subnet sudah di-attach ke router. Ketiga cek apakah IP forwarding aktif di node network (sysctl net.ipv4.ip_forward). Keempat cek iptables/nftables tidak memblokir traffic dari IP range tenant network.
# Cek IP forwarding
sysctl net.ipv4.ip_forward
# net.ipv4.ip_forward = 1   ← harus 1

# Cek routing di namespace Neutron router
sudo ip netns list | grep qrouter
# qrouter-xxxx-yyyy-zzzz

sudo ip netns exec qrouter-xxxx-yyyy-zzzz ip route
# default via 203.0.113.1 dev qg-abcd
# 10.10.0.0/24 dev qr-efgh
Q: Data VM hilang setelah DevStack di-restart atau server reboot, normal?
DevStack memang bukan untuk persistent — banyak state-nya disimpan di tmpfs dan tidak survive reboot. Setelah reboot, jalankan ulang ./stack.sh atau ./unstack.sh && ./stack.sh. Kalau ingin data VM survive, pakai Cinder volume dan simpan data di sana sebelum reboot, bukan di root disk VM.
Q: Berapa banyak VM yang bisa jalan di satu compute node?
Tergantung resource fisik dan flavor yang dipilih. Rumus kasar:
Max VMs berdasarkan RAM = RAM fisik / RAM flavor
Max VMs berdasarkan CPU = (vCPU fisik × cpu_allocation_ratio) / vCPU flavor
Default cpu_allocation_ratio di Nova adalah 16.0 (overcommit 16x). Server 8 core fisik bisa menampung VM dengan total 128 vCPU. Overcommit berguna saat sebagian besar VM tidak aktif secara bersamaan, tapi perlu dimonitor agar tidak noisy neighbor.
Q: OpenStack support Windows VM?
Ya. Upload Windows disk image (format qcow2 atau raw) ke Glance dengan config os_type=windows, lalu boot VM dari image itu. Untuk koneksi, pakai VNC/SPICE console via Horizon atau gunakan floating IP dengan port 3389 (RDP) yang dibuka di security group. Driver VirtIO untuk Windows perlu di-inject ke image agar performa disk dan network optimal.
Q: Bagaimana cara backup VM di OpenStack?
Ada beberapa cara:
openstack server image create my-vm-01 backup-20260310— buat snapshot dari running VM, disimpan ke Glance. Ini mudah tapi perlu disk space di Glance.- Cinder volume snapshot:
openstack volume snapshot create my-data-vol— snapshot storage volume, lebih granular. - Live migration ke compute node lain untuk maintenance tanpa downtime:
openstack server migrate --live compute2 my-vm-01 - Untuk backup konsisten, matikan VM dulu, buat snapshot, hidupkan lagi.
Q: Apa itu Ironic dan kapan dipakai?
Ironic adalah service OpenStack untuk bare metal provisioning — deploy OS langsung ke physical server tanpa hypervisor. Dipakai saat performa VM tidak cukup, misalnya untuk high-performance computing, database besar, atau workload yang butuh akses hardware langsung. Prosesnya mirip PXE boot tapi dikontrol via OpenStack API.
Q: Bagaimana cara monitor resource usage semua VM?
Ceilometer + Gnocchi untuk metrics real-time. Untuk dashboard lebih visual, bisa integrasi dengan Grafana + Prometheus (pasang node_exporter di setiap VM, atau pakai ceilometer exporter). Atau pakai Watcher untuk optimization dan rebalancing VM antar compute node otomatis berdasarkan metrics.
Q: Apa beda tenant network flat, VLAN, dan VXLAN?
- Flat: tidak ada tagging, semua VM satu network. Sederhana tapi tidak scalable, tidak bisa isolasi antar tenant.
- VLAN: isolasi pakai VLAN tagging (802.1Q). Scalable sampai 4094 tenant. Butuh switch yang support VLAN trunking.
- VXLAN: enkapsulasi layer 2 over UDP/IP, mendukung hingga ~16 juta tenant network. Tidak butuh VLAN di switch fisik, cocok untuk datacenter skala besar. Default choice untuk multi-tenant OpenStack modern.
Q: Kolla-Ansible vs OpenStack-Ansible, mana yang lebih baik?
Tidak ada jawaban mutlak, tergantung kebutuhan. Kolla-Ansible lebih mudah upgrade karena tiap service terisolasi dalam container, cocok untuk yang familiar dengan Docker. OpenStack-Ansible lebih fleksibel untuk konfigurasi custom dan lebih dekat ke instalasi bare metal tradisional. CERN dan banyak research institution pakai OpenStack-Ansible. Rackspace dulu pakai OpenStack-Ansible juga. Kolla lebih populer untuk deployment baru karena isolasi yang lebih bersih.